
Building My Shop, Part 1 : Wood Stud Wall Framing, Door and Corner Framing
In part 1 of my shop build series, I'll walk you through framing out the walls, doors & office in my new workshop!
Note: The links below are Amazon affiliate links
🛠 Tools Used On The Stud Wall Framing:
📦 All Materials Provided By 84 Lumber :

Pin it!
How To Stud Frame Walls:
So let’s rewind a little bit and I’ll show you how this space looked when I took it over. First of all, since a lot of you are asking, I’m moving my shop into this space because my wife and I recently moved into a new house with a very small garage, and I obviously need space for what I do.
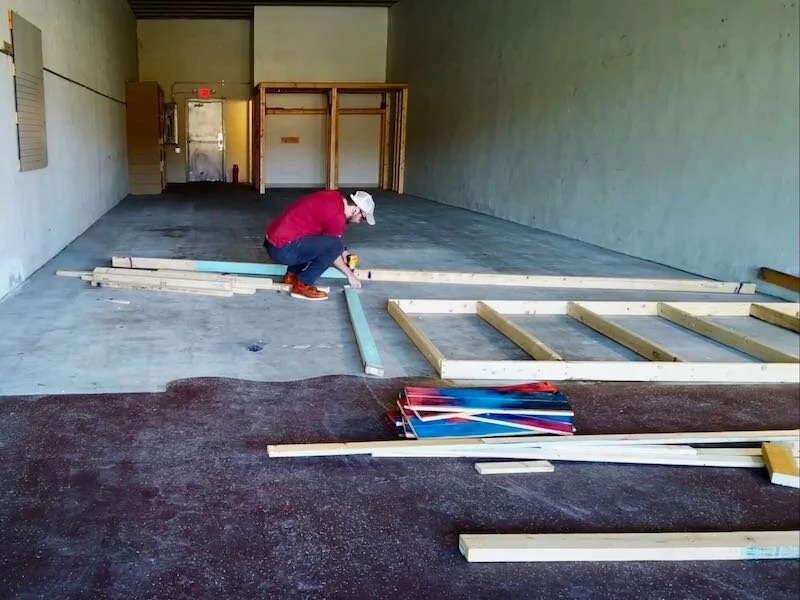
Anyway, the space needed a lot of work. There was weird paint on the walls, a really flimsy partition wall in the middle of the space, and there were also no lights and three outlets in total. There was also an insane amount of echo in the space, since the walls, ceiling, and floors were all concrete, which reflected the sound in the space, creating a huge echo chamber.
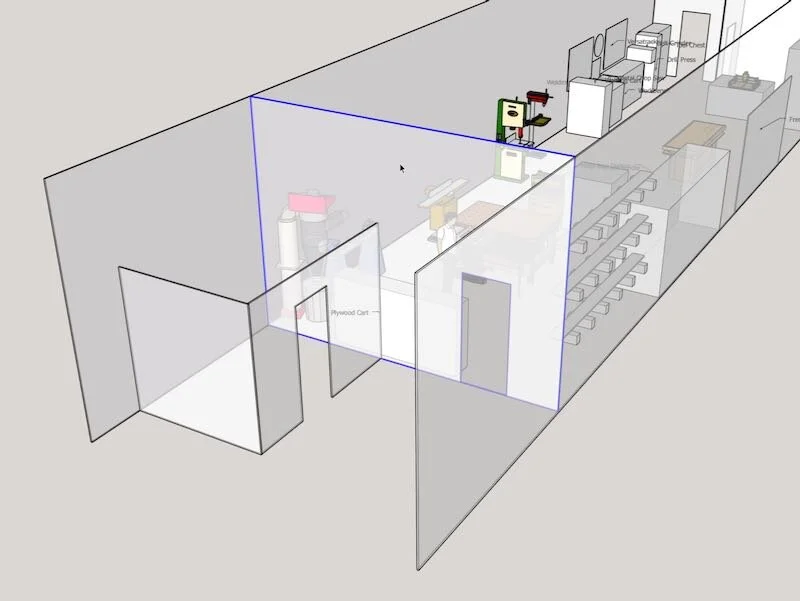
Step 1: Designing My New Shop Space In Sketch Up
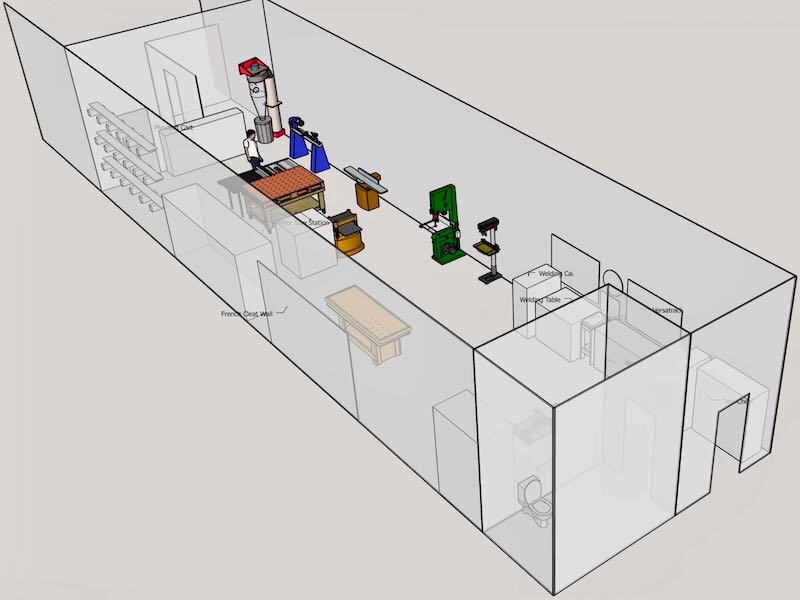
There was obviously a lot to do, and my first step after finding the space and deciding to rent it was to hop into SketchUp and lay out the space. In total, I have about 1500 sq ft, with a 19’ x 79’ footprint. There is a bathroom at the back of the space, which is awesome, and the ceilings are 13’ tall, which gives me ton of room for vertical storage space.
The plan is to divide the space with a partition wall towards the front, which will separate the front office and photo area from the shop space. This will help contain dust to the shop area but will also provide some additional security between the front door and the shop.
In the front area, there will be an 8 foot x 11 foot office, which is where I’ll work at my computer, record my voiceovers, edit videos, etc. Again, having an additional door to get through will provide additional security.
With the layout basically done, I could move on to the actual build out!
Step 2: Demolition Of Existing Walls
The first step was to demo all of the existing structures to give myself a blank slate. This went quickly and we were able to salvage a lot of this material for use during the framing part of the build out. Luckily, almost everything was put together with screws, so we were able to take things apart quickly.
Also, when I say “we”, I mean me and my buddy Justin, who is a licensed general contractor and helped me with this entire build out. You’ll be seeing a lot of him in these photos, so I figured I’d go ahead and introduce him.
Step 3: Lumber Delivery and Preparation
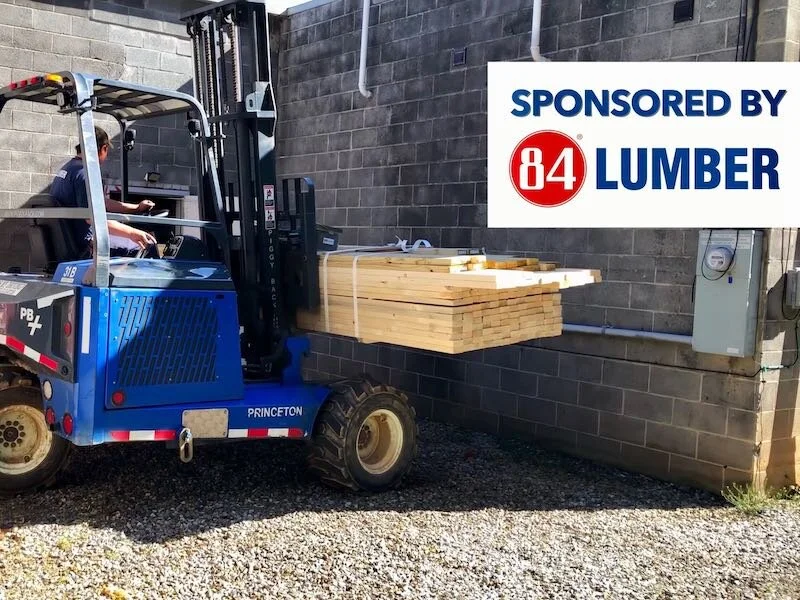
Once the demo was done, next came delivery of the materials for the framing. I worked with 84 Lumber, who is the sponsor of this week’s video, on the materials for this part of the project and I’m so glad I did. I was able to stop by my local 84 Lumber and talk with them about the material options they had available and got a quote from them the same day.
Unfortunately, I don’t have a large door leading into this shop space, so after 84 Lumber dropped off the materials, Justin and I had to move them into the space. This went pretty quickly and allowed us to get things organized for the framing process.
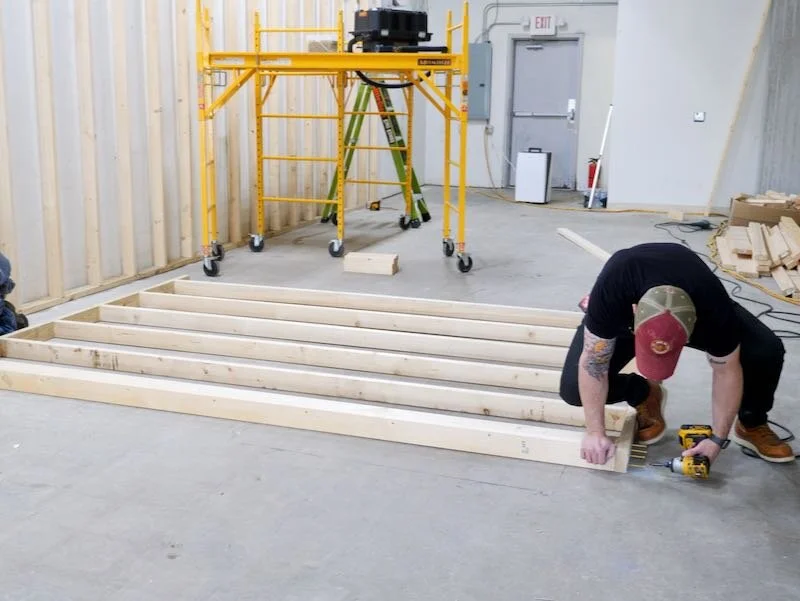
Step 4: Begin Stud Wall Framing
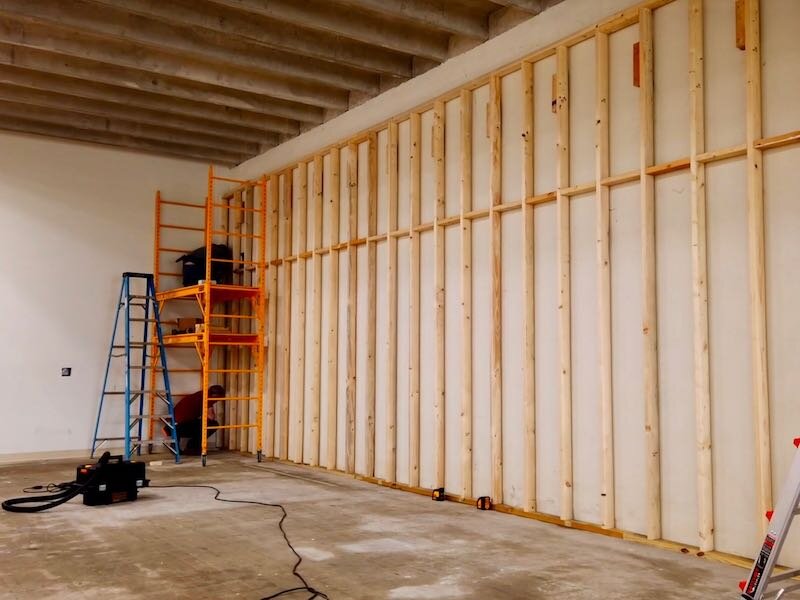
The next day, we got to work framing and the process went pretty quickly, although this was my first time ever framing, so I had a lot to learn. Also, we used 3” screws rather than nails for this build, in case I ever need to remove any of this material if I have to leave the space in the future, so that slowed things down as well.
Rather than try to get a ton of detail shots on the first side wall, I decided to let the camera run and soak up some knowledge from Justin. After finishing that first wall, I felt like I had the process down well enough to get some more detailed shots so I could show you all the process we followed.
First, we would set up a line laser roughly four inches off of the wall. The extra half inch of clearance between the concrete wall and 2x4 wall would allow us to work around any inconsistencies in the concrete wall, which there were a ton of, and we could still maintain plumb in our new walls.
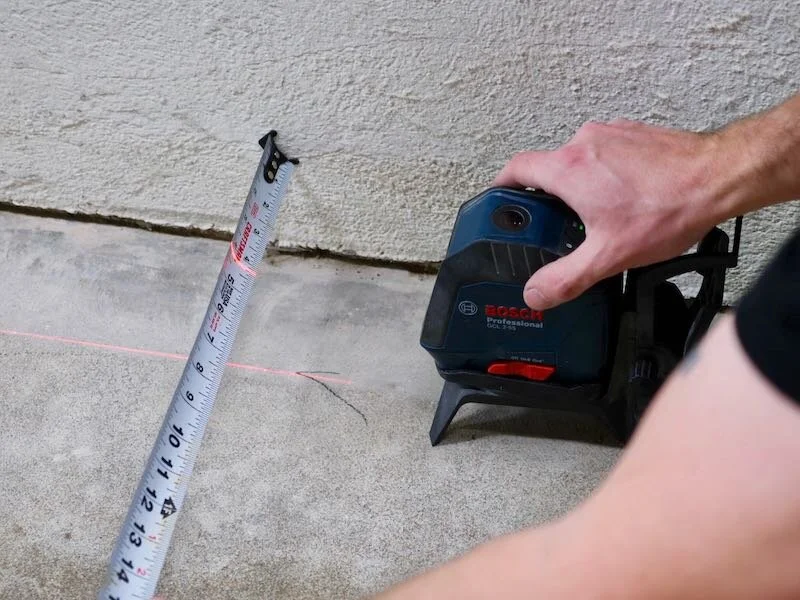
After getting the line laser set up, we would make marks on the floor to indicate where to hold the chalk line, and then we could snap a chalk line along the entire length of the wall. We would work back in sections when doing this, so that the chalk line stayed nice and straight.
Next, we could get to framing the first wall section. We were building these walls in 12 foot sections, but we cut this first wall section to 11 feet 5 inches, to offset the last stud from the end of the wall section. This would allow us to have a consistent 16 inch on center stud spacing along the entire wall and have a relatively even spacing of the studs from the ends of each wall section.
To mark off the stud locations on this first wall, we pulled a tape from the end of the top plate and made a mark at 1 ½” for the first stud. The next mark was at 15 ¼”, which will be where the edge of the stud needs to fall to get the 16” on center spacing.
We continued down the top plate, making marks ¾” back from each stud center, which is indicated on most tape measures with big red numbers.
After marking the stud locations, we transferred the mark to the bottom plate, making sure the top and bottom plate were aligned. We also marked a square reference line across both plates and marked an X to indicate which side of the line the stud would fall on.
With the stud locations marked out, we could start laying out the wall section. I flipped up the top and bottom plate, facing our marks towards the inside, and started placing studs.
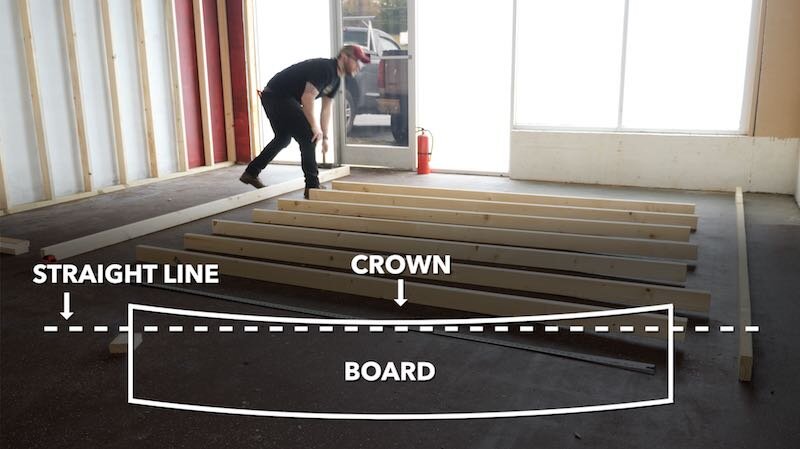
When placing the studs, I made sure to crown them, which meant I was checking to see which way the studs curved along their edge. We faced the crowned edge towards the floor, so that we wouldn’t have to fight the crown when putting the stud wall against the concrete wall later.
Also, these studs aren’t crowned as bad as they look, the floor is just that uneven.
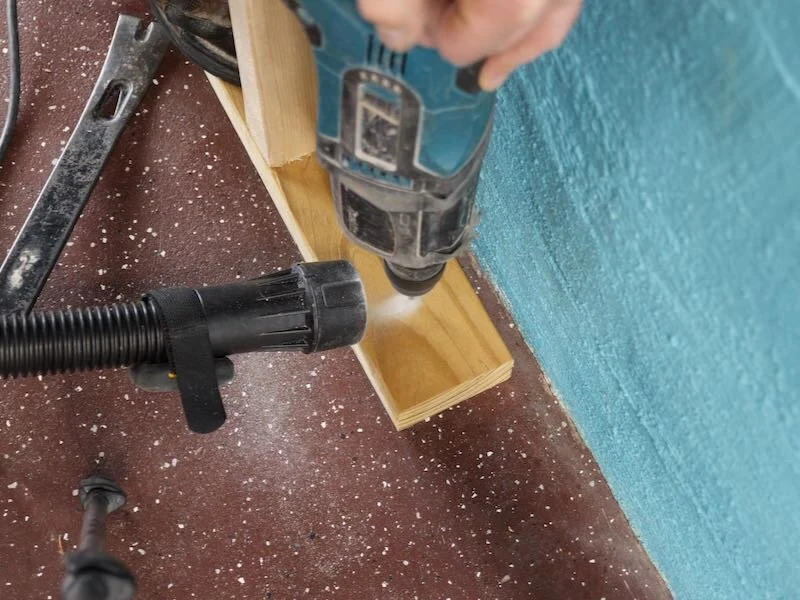
After crowning all of the boards, we could get the wall assembled. As I mentioned earlier, we used 3” screws for pretty much all of the framing. These screws are incredibly strong and drive easily with no pre-drilling.
When assembling these walls on my less than flat floors, I found it made things a lot easier to partially drive in the screws before attaching the stud. This left my other hand free to hold the pieces in place while fully driving in the screws.
We would start at each end of the wall, fastening the four corners, and then go back and attach the rest of the studs in the middle of the wall. This just kept the bottom and top plate from moving around when trying to drive in the screws.
Setp 4: Adding Blocking To Wall Framing

After getting all of the studs attached, we marked out the location for our blocking, which we added at 8 foot and ¼” from the bottom of the wall section. This would allow us to use this blocking as a nailer when attaching the plywood and drywall to the walls later.
After we snapped a chalk line, I would go back and transfer the lines around the sides of the studs, so that we could keep the blocking nice and straight.
Most of the blocking installed in the same way as the studs, with us driving 3 inch screws through the ends, but we did have to drive some of the screws diagonally when a previously installed piece of blocking was in the way.
Also, when installing blocking, we would add two pieces, skip one, add two pieces, skip one, etc. This allowed us to check the stud spacing before installing the rest of the blocking, to make sure the blocking wasn’t causing the wall to bow out along its width. This could be the case if the studs are especially bowed or if you cut your blocking inaccurately.
After checking this measurement, we would install the rest of the blocking and then could get the wall section stood up.
When standing up the wall, we would make sure the bottom plate was in line with the chalk line we snapped earlier and, on this first wall section, we made sure it was butted up against the existing wall corner.
To fasten the wall sections to the floor and walls, we used these enormous Titen 2 masonry screws, and thankfully Justin had an SDS drill for us to use during this process, because we had to drill 1 ¾” into the concrete for each of these screws.
This was my first time using an SDS drill and I was amazed at how much easier it was to drill these holes vs a standard hammer drill.
We got in a good rhythm here, with Justin manning the SDS drill and me on vacuum duty, then I would drive in the screw once the hole was drilled. I would definitely recommend some sort of dust control here, because drilling into concrete creates a ton of fine dust that you really don’t want to be breathing.
As you can see here, occasionally the bottom plate would be slightly out of whack, so we’d use a pry bar to keep it in line with the chalk line while drilling the hole and driving in the screw.
Also, these holes sometimes got packed with dust and the screws wouldn’t fully seat, so we’d run the bit in and out of the hole while running the vacuum, which really helped to clean out any residual dust and allowed the screw to drive fully.
Step 5: Checking Stud Walls For Plumb
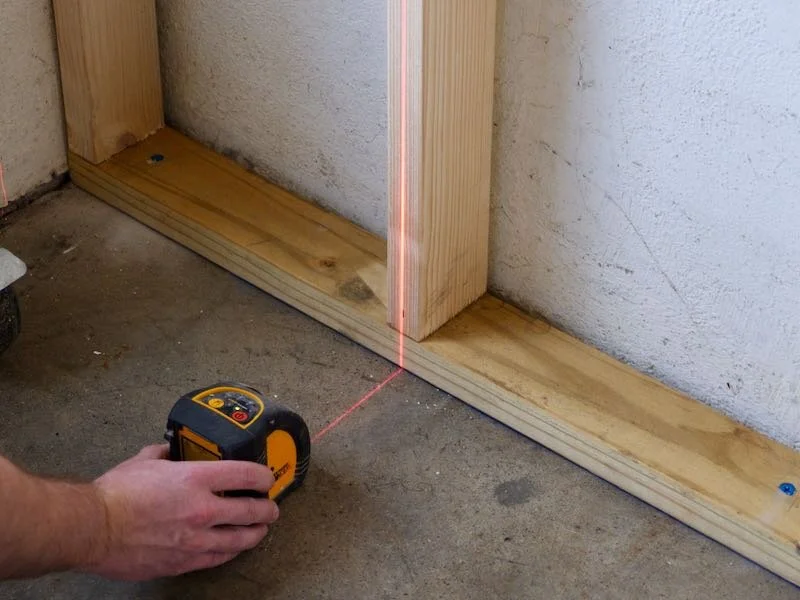
After getting the bottom plate attached to the floor, we could trust that the wall wasn’t going to fall over on top of us, so next we would check the wall for plumb.
This was extremely simple with the line laser, which you’ll see a lot of during this project. I’ll just go ahead and say that lasers are my new favorite thing and they made this whole project so much simpler.
To check for plumb, we would mark a center line on one of the studs at the top and bottom, line up the laser with the bottom center mark, and then see how far off the laser was from the top center mark.
Getting this first wall section plumb really dictated the rest of the walls, so we really took our time. On this particular section, we were able to shim the wall section against the concrete wall to get it plumb.
Step 6: Attaching Framing Walls

To attach the top part of the wall sections to the concrete, we would add two pieces of 2x4 blocking and then we could drive screws through the stud into the blocking to fasten the wall in place.
Once again, the SDS drill was utilized to drill two holes into the concrete, and then I could drive in two more screws. Since these wall sections stood off the concrete about an inch at the top, we would add a second piece of blocking on top of the first to give us more material to screw into.
To make sure the wall was plumb in this in and out direction, we would set up another line laser 3 inches off of the bottom plate, and then we could check this measurement at the top plate, get it dead on, and then drive in a few screws through the sides of one of the studs into the blocking.
After getting the first area attached, we would move down two studs and repeat the process all over again, checking for plumb the entire length of the wall section. Since the side-to-side alignment was locked in after that first section, we were really just checking for plumb in the in and out direction from that point on, so things went a lot quicker.
We just kept repeating the process until we got that wall section fully secured and, let me tell you, these walls aren’t going anywhere, they’re rock solid!
With the first section in place, we could repeat the process for the second section. On this section, we cut the top and bottom plate to exactly 12 feet or 144”, and then to mark the stud locations, we pulled the measurement off of the studs from the previous wall section. This made sure that any inconsistencies between the sections wouldn’t throw off our stud spacing along the length of the wall.
Also, when marking the studs on this wall section, we could mark them right at 16”, 32”, etc., without having to measure back ¾”, since we were pulling the tape off of the edge of the previous stud.
One unique piece of this wall section was this stud pocket, which is where the partition wall that runs across the width of the shop is attached.
This stud pocket is essentially three studs, connected in a u-shape, and this provides a place to attach the perpendicular wall later.
After building the stud pocket, we could lay it out on the top and bottom plates, then transfer the rest of the stud locations before moving onto building the wall section. This process went exactly the same as the last section, except that some of the blocking pieces needed to be cut shorter to account for the stud pocket.
Step 7: Attaching Stud Walls To The Floor
Attaching the wall to the floor was also the same process, drilling the holes with the SDS and driving the masonry screws.
To attach the wall sections to each other at the top plate, we used a piece of blocking. When attaching this piece of blocking, we checked the new wall section for plumb in the side to side direction and made any necessary adjustments by cutting the piece of blocking longer or shorter.
Step 8: More Framing
After getting the new section plumb side to side, we just repeated the process of attaching the wall section to the concrete wall with blocking, and then we could work on the partition wall.
As I mentioned in the beginning of the video, the partition wall will separate the front office area from the shop. This wall will be floor to ceiling, so we built it in place rather than building it on the floor and trying to stand it up. The floor was just too uneven to try to do that.
First, we set up a line laser perpendicular with the stud pockets we created earlier and marked out where the edge of the top plate would be land on the ceiling. We also made marks up the stud pocket vertically to make sure our walls would be perfectly plumb.
Next, we snapped a chalk line where the bottom plate would sit, and after cutting two pieces for the bottom plate, we could start laying out where everything would go.
The first thing to lay out was another stud pocket, which is where the outside wall of the office would meet the partition wall. We made this at 8 feet, since the office would be 8 feet deep.
Step 9: Framing Out The Door
The next thing to layout was the location of the door leading from the front area into the shop.
We decided to have this door basically right next to the office wall, to provide plenty of clean wall space on the photo wall in the front area.
To do this, we butted the door framing right up against the stud pocket.
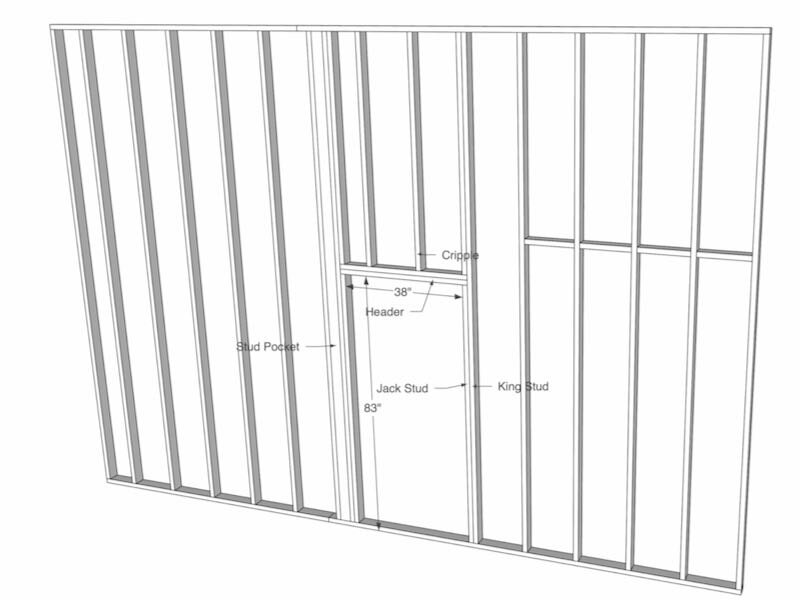
Let’s take a second to look at how a door is framed and, more specifically, how we framed this door.
On the outside of the door framing, you’ve got the king stud, which runs the full height of the wall. On the inside of the king stud is the jack stud, which runs from the bottom plate to the header. The header in our case was just two pieces of 2x4 stacked together, but this will depend on your local code and whether your wall is load bearing.
Above the header are cripples, which are basically the remaining parts of the studs that would have run where your doorway was placed.
As you can see, on the left side of the door, the rightmost stud of the stud pocket is acting as the king stud here, which not only helps to reduce wasted lumber, but keeps the door and office as close together as possible.
So back to the actual work, after getting everything laid out on the bottom plate, one tip I got from Justin was to cut about halfway through the bottom plate where the inside edge of the jack stud is located. This section is removed when installing the door later, and it’s much easier to do this without having to cut all the way to the floor, which could damage the floor or your tool.
Next, we could fasten the bottom plate to the floor in the same way as with the previous wall sections, making sure the pieces stayed aligned with our chalk line.
We fastened the top plate to the ceiling using similar concrete screws and lined up the top plate with the marks we had made previously when using the line laser.
Also, you might notice that the top plate is actually longer than the bottom plate, since it extends all the way to the concrete walls.
To transfer our measurements from the bottom plate to the top plate, we again called on the line laser. I would line up the laser with one end of the lines and Justin would transfer that mark to the top plate, using a square to bring the line across. This meant I didn’t have to try and perfectly align the laser with the entire line, just one end of it.
To determine the length of the studs here, I used another type of laser, a laser measure. Pulling a tape between the top and bottom plate was pretty tricky, and this laser measure was incredibly accurate, which we confirmed a few times with a tape measure.
And as expected, these measurements changed across the floor, since the floor wasn’t level, so every stud had to be cut to length.
Once the boards were cut to length, we could start putting the wall together. First, we added the stud pocket, where the office wall would attach to the partition wall, and then we could start adding the rest of the door framing, starting with the king stud.
As you can see, we had to toenail these studs in place, and another tip Justin gave me here was to drive in a few screws partially to help keep the board in place before driving the screws in all the way.
Next, we could attach the jack studs by screwing them to the king studs as well as the bottom plate. As I mentioned, we used 3” inch screws throughout most of this build, and we needed to drive them in at an angle here so they wouldn’t come out the other side of the king stud.
With the jack studs in place, we could attach the header, which again is just two 2x4s screwed together.
Once the header was in place, we could add the cripples, starting with the cripples on either side. The reason to add these first is so you have room to add screws without the other studs getting in your way.
After adding the rest of the cripples and finishing the door framing, we could move on to the rest of the studs, starting with the stud against one of the side walls. We fastened this directly to the stud pocket in that wall, which connected the two walls extremely securely.
We could then continue working our way down the wall, filling in the rest of the studs. The only other thing to add after getting the studs installed was more blocking at 8 feet, which we did later off camera.
Step 10: Stud Wall Framing The Office

With the partition wall done, we could move on to the office. This was mostly the same process as before, but we did use the 3-4-5 method to ensure the two office walls were square to each other.
To use this method, we pulled a diagonal measurement of 10 feet from the corner of the office wall and marked this with a block of 2x4. We knew the office wall was 8 feet from the side wall, so all we needed to do was make sure the other end of the bottom plate was 6 feet from the block of 2x4 and that would ensure that corner was square.
We marked that location and then snapped a line where that wall would be installed.
Next, we laid out the stud locations on the two office walls. This was more of the same process, laying out the door and studs. The only difference here was the corner where the two office walls met.
The corner consists of three pieces of 2x4 stacked together, with the center piece being made up of shorter blocking pieces, which helps to use up scrap.
This triple layered 2x4 will give plenty of meat to attach the perpendicular office walls, but will also provide a place to attach the wall covering later, which is plywood in my case.
After getting that wall done, we added another stud pocket to the left side wall and then laid out the shorter office wall, which was just a simple stud wall with no special layout.
Finally, we could stand up the walls and get them attached to the other walls as well as the floor. I realize this is a terrible angle of this process, but hopefully you can see how that outside corner provides a place for the shorter office wall to connect to the longer office wall.
Step 11: Building The Office Ceiling
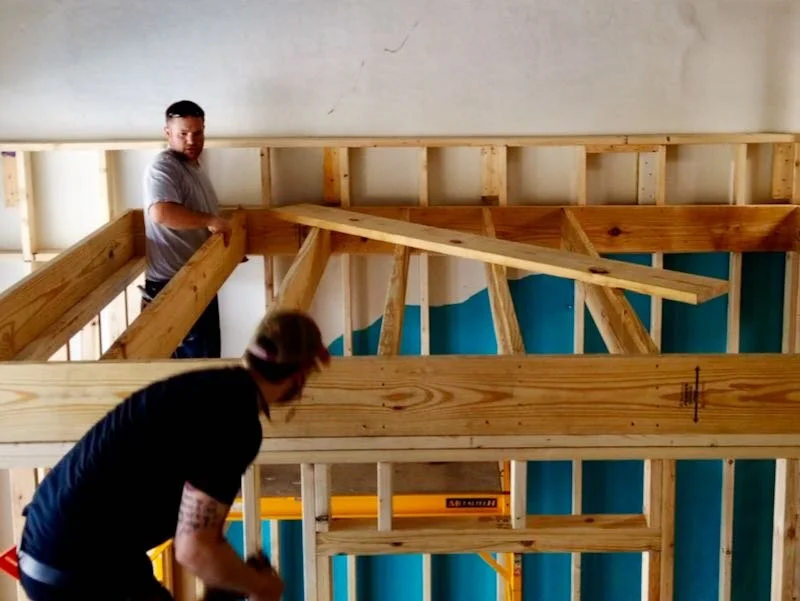
The last bit of framing to do in the front area was the office ceiling. We used 2x10s for this, which was complete overkill but it’s what we needed to use to be able to house the can lights I wanted to use in the office.
The first board to cut here was the ledger, which is what the ceiling joists would attach to on the side wall. Since Justin’s miter saw didn’t have the cut capacity for these larger boards, I pulled out my track saw and it worked great for this.
To hang the ledger board, we set the board against the top plate of the office wall and then used the line laser to get a measurement we could mark at the other end to ensure the ledger was level.
Now, this was kind of a weird process, because we knew the floor wasn’t level, so we were going to be out of level in some direction, but we decided to make the ceiling level along the long side and that ended up working out pretty much fine.
Speaking of which, this problem came up again when installing the other ledger board, as the angle of the floor caused there to be a gap at the bottom of the board on Justin’s side, which was pushing my end of the board too far out on the top plate of the office wall.
To fix this, we scribed the line and cut a slight angle on the end of the ledger board using the track saw.
With the angle cut, the board fit pretty much perfectly and we could fasten the ledger to the partition wall.
The next two boards to add were the band boards, which essentially create the rest of the frame for the joists. These boards sit on the outside edges of the top plate and are attached to each other, to the top plates, and to the existing walls.
After installing the second band board, we marked out the joist locations, which should fall above the studs below, and then we could start installing the joists.
To attach the joists, I screwed through the band board on my side and Justin toenailed the joists in place temporarily on his side.
Once the joists were placed, we came back and added joist hangers to permanently attach the joists to the ledger board. When adding joist hangers, you use two different lengths of nails. The shorter nails attach the joist hanger to the ledger board and the longer nail attaches diagonally through the end of the joist into the ledger.
Also, I find this clip pretty funny, watching me struggle to get two of these joist hangers installed in the same time Justin got four installed. I guess I need to work on my hammer skills, hah!
The last board to add to the office was a nailer in between the last joist and the band board, and this will give us a place to attach the plywood ceiling later on.
Step 12: Final Framing In Shop Space
With that, the office and partition wall were finished, so all that was left to do was finish framing the rest of the side wall. This was just more of the same process as before, marking lines on the floor, building wall sections, attaching them to the floor, attaching them to the previous wall section and then attaching them to the concrete wall.
You might be wondering why we didn’t add a full length double top plate to this left side wall, and that was for a few reasons. First, since these walls are essentially aesthetic, are fastened directly to the concrete, and are not load bearing, a double top plate would have been a waste of lumber here.
Second, these 10 foot studs were actually pre-cut to length to accommodate a bottom plate and single top plate and still have the walls end up at exactly 10 feet tall, which will make adding the plywood walls later much more efficient as far as not having weird off cuts to deal with.
Anyway, this was all the same repetitive process until we got to the very end, where we needed to create a short wall section to finish the wall. At the end of this wall, we added an L-shaped stud section, which meant we didn’t need two studs right next to each other and this also made running the electrical through that area to the panel later much easier.
And with that, the framing in this new shop was finished!