Building the ULTIMATE Music Studio & Gaming Desk Setup
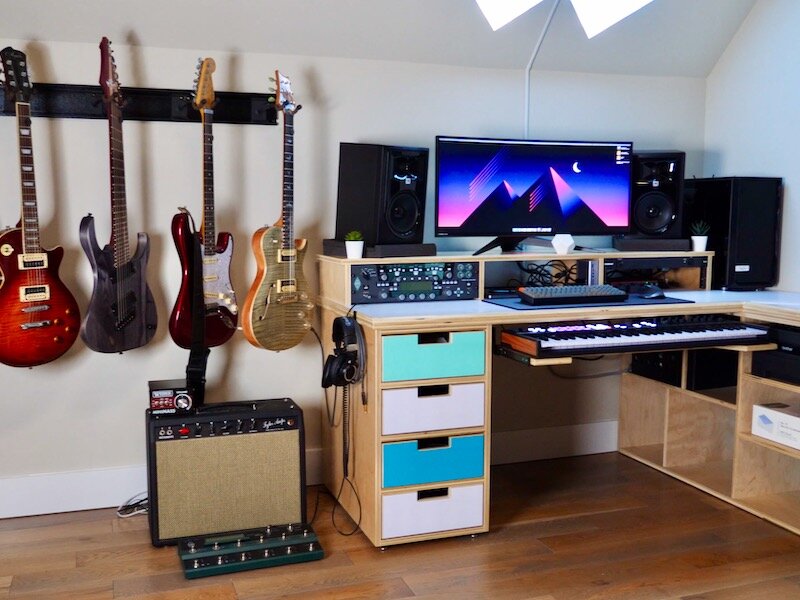
Learn how to build the ULTIMATE music studio and gaming desk setup! Complete with rack mount gear, MIDI keyboard tray, wireless charging, and a gaming PC, and all neatly organized.
🛠 Tools Used On The Music Studio & Gaming Desk (affiliate):
Magnetic Screw Holder (for my impact driver)
Note: The links below are affiliate links
📦 Materials Used On The Music Studio & Gaming Desk (affiliate):
🎸 Music Studio Equipment :
💡 Lighting :

Pin it!
Process For Building Your Own Ultimate Music And Gaming Desk:
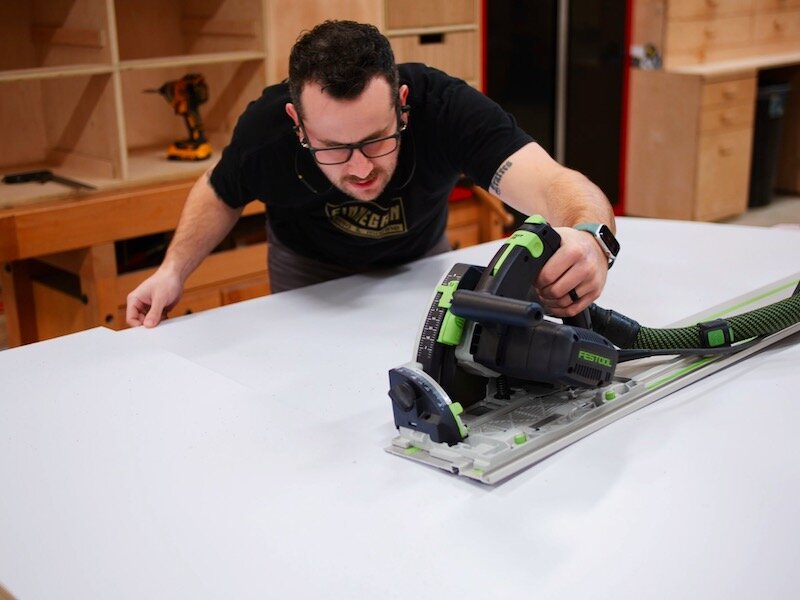
Step 1: Breaking Down Plywood On Table Saw

Alright, let’s get back to the bonus room series and finish things up with this gaming and music production desk. I continued with the all-plywood theme on this part of the build, so the first step was breaking down my sheets of plywood into their individual parts.
As always, I used a combination of my table saw and track saw for this, and I was able to get all of the parts cut really quickly since I had my cut list and cutting diagram already printed off. Speaking of which, if you’d like to build a desk like this for yourself, I do have a set of plans available, which I’ll link to here. This is a fairly straightforward build that you could create with minimal tools, and I’m loving the finished desk so far.
Step 2: Overview Of Elite Music And Gaming Desk
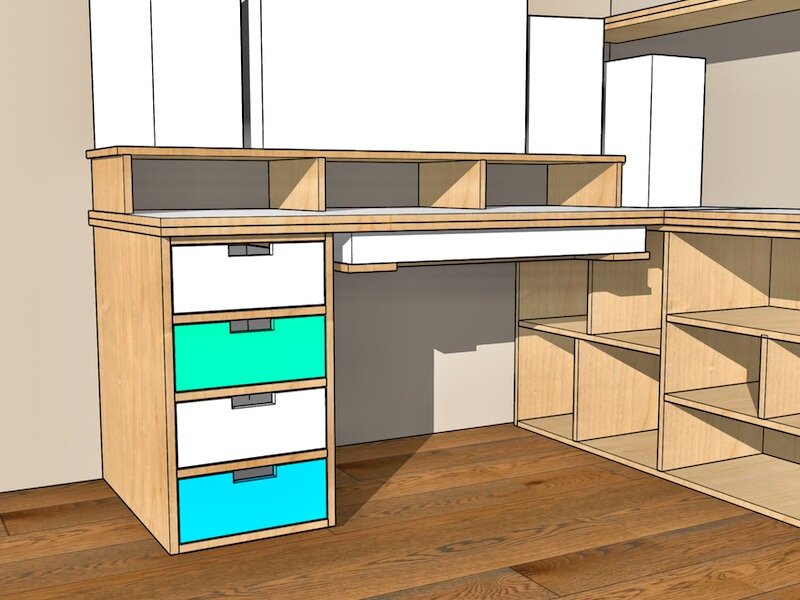
Anyway, before jumping into assembly, let’s hop into SketchUp so you can see the structures I’m going to be working on.
First, there is this bookcase which will live under the right side of the desk top. This bookcase will house our printer, various office supplies, and longer term storage items towards the back of the desk since those aren’t easily accessible.
Next to the bookcase is a filing cabinet, which I designed to fit the space between the Murphy beds and the bookcase underneath the window.
Supporting the left end of the desk top is another smaller cabinet with a bank of drawers.
And finally, there is the desk top itself, which is made from double layered plywood. It features a monitor stand with room for rack mounted music equipment below the monitor, as well as a slide out tray for my MIDI keyboard.
Step 3: Plywood Bookcase Assembly

Back to the build, I first started by assembling the bookcase. These Rockler corner clamping jigs are awesome when assembling cabinets like this, as they allow you to get everything aligned before attaching the pieces.
To build most of the cabinetry here, I kept it really simple and used brad nails to tack everything together and then reinforced the joints with 1 ½” screws.

Speaking of screws, I found these new screws from SPAX, which feature a really unique self-drilling tip that allows you to drive in the screw with no pre-drilling. These screws are actually designed for MDF and hardwoods, but they worked great for plywood. I had zero splitting throughout the entire build, which is pretty impressive considering I’m going into plywood edge grain within about 1” of the end of the panels here.
Step 4: Adding Plywood Dividers And Shelves To Desk Base

After getting the cabinet carcass assembled, I could start adding the dividers and shelves. I used the shelves to keep the divider centered in the cabinet and then attached it with more brad nails and screws.
On the top of the bookcase, I mistakenly thought I would need to plug the holes since they’d be visible in the final piece, but I was mixing the bookcase up with the filing cabinet. That’s why you see me measuring out the hole locations and countersinking the holes here.
Once the divider was in, I got the shelves installed, using some plywood scraps to help support the shelves while I attached them.

Also, as you can see, the dividers and shelves are inset from the front edge of the cabinet by about ½”, and this is because I accidentally cut one of the panels too narrow and decided to just go with it. I actually really like the way this ended up looking, and sometimes these mistakes can become design features.
After getting all of the shelves and dividers mounted, I moved the bookcase out of the way with my new best friend, the furniture dolly, and repeated the process for the filing cabinet.

Step 5: Assembling Plywood Filing Cabinet

It went together in the same way, but this time I used my new narrow crown stapler to tack together the pieces and I’m really loving this thing. The joints are way more secure than with just brad nails, and since these sides won’t be visible, I don’t have to worry about covering up the fasteners.
I also attached the back panel using glue and more narrow crown staples, and was actually able to use this reject plywood that was used for protecting my plywood during shipping since it won’t be seen.
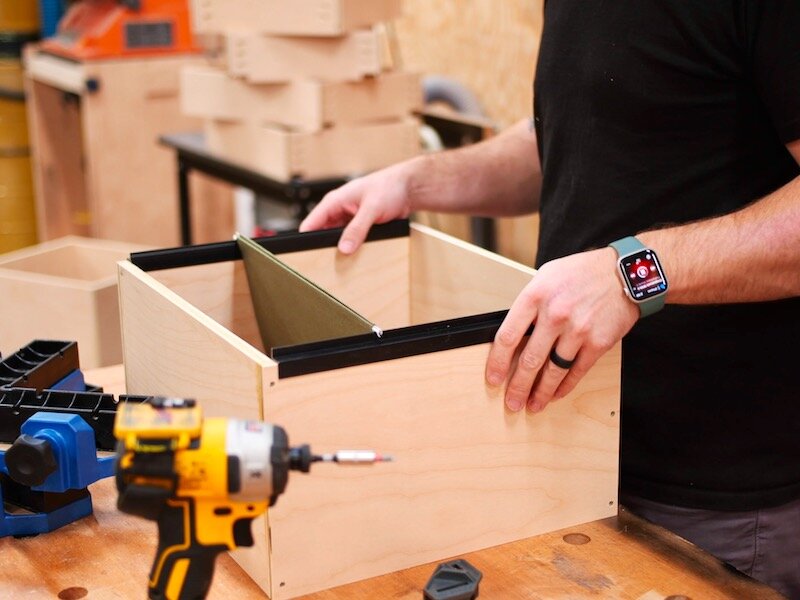
Next, I got to work on the drawers for the filing cabinet, which are just simple boxes made of ½” plywood. Thankfully, I had re-watched my buddy David Picciuto’s video on his filing cabinet project before this build, as he had the brilliant idea of leaving off the bottoms on the file drawers. They’re really not needed since the files will be hanging from the top edge of the drawer, and this worked out great without wasting plywood.
I just assembled the drawers with glue and more of those 1 ½” screws.
After getting the drawer boxes assembled, I could cut this plastic file hanger material, also from Rockler, to length. Be careful if you’re going to do this at the miter saw, as it can sometimes catch and shatter.
This hanger just slides over the top edge of any ½” drawer box and turns it into a file hanger. It’s really simple but works great!
Next, I could get the file drawers installed in the cabinet. Due to the awkward spacing between the Murphy beds and the bookcase, as well as having to match the drawer boxes to fit standard sized file folders, I had to add some ½” spacer strips to the inside of the filing cabinet to provide the correct spacing for the drawer slides. I attached these strips using glue and pin nails and also made sure to use longer screws to attach the drawer slides to the cabinet carcass, so the screws went through the strips into the cabinet carcass rather than just into the strips.
With the strips in, I could get the drawer slides installed, and these monstrous drawer slides are heavy duty over extension slides. Over extension means the drawers can be pulled out past the back edge of the drawer box, giving you full access to the file drawer contents. They’re also rated for up to 150 pounds of weight, which is good considering the weight of a fully loaded file drawer.

All that being said, these were a bit tricky to work with, as they didn’t fit in my drawer slide jig, and I’m not actually sure I needed that high of a weight rating, but I got them working in the end, and you might want to consider similar slides if you’re building a filing cabinet.
Step 6: Building Bank Of Soft Close Drawers

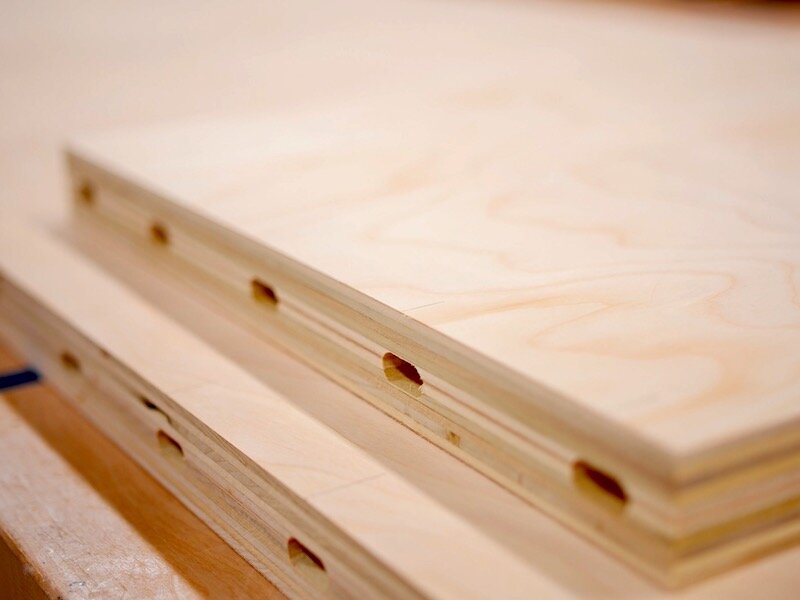
Once the file drawers were in, I moved on to assembling the cabinet for the left side of the desk, and this was exactly the same as all of the cabinets I built for my home bar. I used pocket holes for assembly here, as three of the four sides would be visible in the finished build and I didn’t want to have to fill a bunch of screw holes.
If you want to see more details on how I assemble cabinets like this with pocket screws, go check out my home bar series, as I got into a ton of detail there.
The same goes for the drawers on this cabinet. I used more of the Blum undermount drawer slides, which have quickly become my favorite drawer slides. I did an entire video on building drawers to work with these slides, as well as installing the slides, during the home bar build series, so go check that video out for more details. I absolutely love these slides and would highly recommend them for any high-end cabinetry or furniture project.
Step 7: Creating Plywood Drawer Fronts

With all of the cabinets and drawers assembled and installed, I could move on to cutting the drawer fronts to size. I always wait on this, as I want to make sure my cabinets end up with openings that match my drawer fronts.
I cut the drawer fronts from more of that Oak plywood leftover from the home bar project, and this matches the drawer fronts on the Murphy bed dresser.
After cutting the drawer fronts to size at the table saw and miter saw, I could get the handle cutouts added. I used the same template I created during the Murphy bed build, and it was super handy having this template ready to go. I’m planning to create a handful of these templates on the X-Carve, with different shapes and sizes, so I can have them ready to use.

I traced the outline of the handle on the drawer fronts and cut away the bulk at the bandsaw. I still have my big resaw blade installed, so I had to make some relief cuts first, but this still went really quickly.
I flushed up the handle cutouts to the template at the router table, using a small flush trim bit, and this left me with perfectly matching drawer handles for every drawer front.
Step 8: Installing Plywood Drawer Fronts

Next, I could get the drawer fronts installed, and let me tell you, it’s a heck of a lot easier to install them with the handle cutouts already added, which I didn’t do during the Murphy bed build.
I used these scraps of ⅛” HDPE as spacers to get the drawer fronts aligned, and then clamped them in place and added a few screws from the inside of the drawer box.
Also, you might notice that the drawer box actually shows through the handle cutout on this smaller cabinet, but luckily I was able to cut these drawer boxes down by about ½” at the table saw off camera to solve this.
With the drawer fronts installed, I could subsequently remove them and get half of them prepped for paint, to match the drawer fronts on the Murphy bed dresser.
Step 9: Applying Paint To Drawer Fronts With HVLP System

I had to roll the paint on those drawer fronts, but this time I called on my new Flexio 5000 paint sprayer from Wagner Spray, who is one of the sponsors of this video. The Flexio 5000 comes with two nozzles, one for spraying larger surfaces areas and one for more detailed work, like these drawer fronts. It’s a really great system for spraying a bunch of different finishes, it’s super adjustable, and everything stores away in this small container.

I sprayed TotalBoat Elixir, which has become my go-to paint for furniture projects. Elixir is a water-based enamel paint, so it dries really quick and has low VOCs, and it’s also really easy to clean up. It also sprayed really well with no thinning, and I was able to get three coats of paint on in a little over three hours, which is awesome.
After letting the paint dry overnight, I could get the drawer fronts cleaned up. If you watched the Murphy bed video, you’ll know that I chamfered the drawer fronts prior to painting last time, but this time I decided to chamfer them afterwards, and this ended up being much better. By chamfering after painting, I was able to get a super clean edge without having to clean up those chamfers.

To keep the paint from getting scuffed up, I did add a few strips of ¼” plywood to lift the face of the drawer front off of the router table, and this worked great.
After chamfering, I did still have to clean up some overspray on the edges of the drawer fronts, and I really should have just taped off the edges to avoid this. You live, you learn I guess.
Also, as you can see in this shot, I added laminate to the other drawer fronts, but we’ll get to that in a bit.
Step 10: Building Plywood and Laminate Desk Top With Wireless Phone Charging Station

The next thing to work on was the desk top, which is made, as I mentioned, from two layers of ¾” plywood. The desk top has an L-shape, and the easiest way to create this, in my opinion, was to make two separate sections and then join them together.
I glued up the two sections, making sure to use plenty of glue, and attached the two layers in each section with a bunch of narrow crown staples to act as clamps. I also made sure to avoid getting too close to the edges, as I knew I’d need to trim the panels to size at the table saw.

After letting the glue dry, I trimmed the panels to their final width, and I somehow didn’t notice how much dust was spraying off the table saw while I was trimming the panels.
Well, as it turned out, I had forgotten to re-attach my dust hose after cleaning up around the shop, so I had no dust collection during those cuts. Oops!
Anyway, I cut the panels to length using my track saw, checking them for square after cutting, and then I could get them attached.
This joint isn’t really structural, as the joint will be supported from below by that bookcase, but I still used some Dominos to give the joint more strength, as well as to help with alignment. And, as usual, here’s the obligatory “dowels would also work great here”.
After cutting the mortises, I added glue and Dominos and got the desk top clamped up, calling upon my longest parallel clamps.
Once the glue had dried for a bit, I removed the clamps and started laying out the shape of the desk top on my piece of laminate. I essentially sized this desk top to be as large as it could be using this one piece of laminate, and that way I could avoid any seams in the final desk top.
I cut the shape into the laminate using my track saw, and this is where I started to run into problems.
You can’t really see it, but a tiny hairline crack appeared near that inside corner after cutting, and I figured it would just go away in the finished desk top. I figured wrong.
Before attaching the laminate, I sanded the desk top, mostly to remove any kind of ridge where the two top pieces were joined together, and then I could get the contact cement rolled on.
As I mentioned during the Murphy bed video, I found some water-based contact cement from WilsonArt that has virtually no fumes, and this was super helpful in keeping my shop from becoming a chemical warzone during this process.
That said, this stuff is much thinner than the other contact cement I had used and I consequently added way, way too much of it, so I ended up having to remove some of the excess with paper towels.
Also, a helping hand would have been great here, as removing the laminate from the desk top was when that crack really started to get worse. It was basically impossible to move the piece by myself without just flopping it onto the floor, and that did not help matters.
After letting the contact cement set up, I set up my bar clamp spacers on the desk top and went to lift the laminate onto the desk top, and this is where things really went bad with the crack, as you can see.

I was still in crack denial and figured it would mostly close up with the contact cement, but I again figured wrong. I rolled the living crap out of that area with my pressure roller, but it didn’t really help much.
I decided to put a pin in the crack problem and soldiered on, adding the laminate to the remaining drawer fronts. This went much more smoothly, as you can imagine, and I flushed up the laminate with a flush trim bit and then added a chamfer to the edges off camera.
Back to the desk top, I decided to go ahead and flush up the laminate to really assess how bad the crack was, as I knew some of it would be trimmed away, and I guess I was still thinking I was going to edit out this mistake at this point, as I didn’t get any close ups of it.

After flush trimming, I came back and added a light chamfer to all of the edges using a chamfer bit.
On the front edge, where your arms would rest when working at the desk, I decided to add a super heavy chamfer, and I love the way this ended up looking. This was as large of a chamfer as I could add with my chamfer bit, and I think the finished look is just awesome.
Finally, I came back and chamfered the corners of the desk top, and I used my block plane for this, as it would have been really awkward to try to do this with a router.
After sleeping on the crack issue for a bit, I came up with what ended up being a perfect solution, and that was to cover the cracked area with a wireless charger. I was already planning on adding the smaller IKEA Nordmarke wireless charger to this desk, but I realized that the larger version of the charger would cover the crack entirely.

I immediately placed an order for the larger charger, since my closest IKEA is two hours away, but unfortunately I still didn’t actually have the charger in my possession. That meant I had to cut out this hole in the desk top blind, based solely on the measurements from the IKEA website.
This was extremely nerve wracking, to say the least, but I was luckily able to call upon my Inventables X-Carve to create a template for the wireless charger cutout. I actually used the installation instructions on the IKEA website to come up with the measurements and used those to create the template design in Easel, Inventables’ free CNC software. This ended up working great and, spoiler alert, the charger ended up fitting perfectly, actually ever so slightly snug.
Anyway, after cutting the template out on the X-Carve, which I’ll link to in the video description, I could lay out the exact location on the desk top.

I was originally thinking I would place the charger parallel to the front edge, but this still wouldn’t cover the crack entirely. Instead, I decided to make the charger a bit of a design feature and mount it at a 45 degree angle from the front edge, which would perfectly cover the crack.
I traced the template outline at this location and then used my jigsaw to remove the bulk of the material. By sheer luck, this hole location avoided all of the narrow crown staples, so I didn’t have to worry about ruining my router bit.
Speaking of which, next I mounted the template to the desk top with double sided tape and then used my router to flush up the cutout with the template. I did this in two passes, going to about half depth on the first pass, and then finished up the cut on the second pass. As you can see, using the template created a perfect cutout, and you can even see the cross section of one of the Dominos that I cut through.
At that point, I just had to cross my fingers and hope that the new charger would fit.

Step 11: Constructing Rack Mounted Plywood Monitor Stand And Keyboard Tray
With that, the desk top was pretty much sorted, so I could move on to the final odds and ends, the first of which was the monitor stand. I kept this super simple and cut it from more of the Birch plywood.
For the joinery, I used basic butt joints, but I went ahead and countersunk the holes so I could add some Oak plugs to make things look nicer.
As I mentioned, I designed this monitor stand to fit rack mounted equipment, and that meant I had to make the spacing between the vertical pieces pretty specific. Rack mount gear has a universal width of 19”, and the height is measured in rack units, abbreviated as U, and 1U equals to 1 ¾”.

I made the monitor stand supports just over 3U high, roughly 5 ½”, which will allow me plenty of options when it comes to gear.
After assembly, I plugged the countersunk holes with Oak plugs, gluing them into place then trimming them flush with my flush trim saw and block plane.
Once the plugs were in, I sanded them totally flush and then sanded the monitor stand up to 180 grit to get it prepped for finish.
That was pretty much it for the monitor stand, and next on the list of odds and ends was the MIDI keyboard tray. I cut this to size at the table saw, using more of that Oak plywood, and then brought the panel over to the X-Carve to add a cutout to the tray.
I modeled this keyboard tray off of the tray on the commercially available Platform music production desk, which I’m sure you’re come across if you’ve looked at these types of desks. They added a little knee cutout, which I thought was a nice touch, so I decided to replicate that idea on the X-Carve.
I had modeled the keyboard tray in SketchUp, and was able to export that vector shape to Illustrator, remove the outer edges, which didn’t need to be cut, and then import that into Easel to cut it out.
I forgot to add tabs before starting the cut, so I just stopped it before the final pass and cut away the excess at the bandsaw.
I also added a little chamfer at the router table, to clean up the edges, and then I could get the tray installed on the underside of the desk top.
For the slides on the keyboard tray, I used these aptly-named keyboard platform slides from Rockler, and they have a really cool feature where they lock out when fully extended, keeping your keyboard from moving around during use.
I assembled the slides, which are height adjustable, at their maximum height, and then mounted half of the slide on the sides of the keyboard tray.
With the slides mounted to the tray, I positioned the tray on the underside of the desk, making sure it was square to the front of the desk. Next, I marked the hole locations, pre-drilled them, and then attached the slide hardware with the included screws.

The tray mechanism works great. It slides out easily and locks out using a friction latch, so you can just push it back in with a little extra force and then it’s held in the closed position with another mechanism. Pretty sweet.
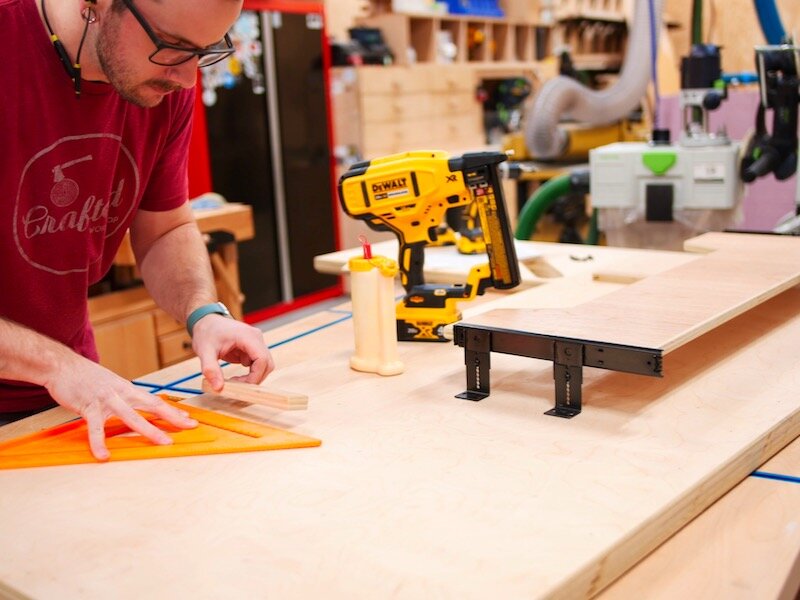
After getting the keyboard tray mounted, I took a few more measurements and came to the unfortunate realization that my MIDI keyboard’s knobs weren’t going to clear the underside of the desk, even with the slide hardware at its maximum height.
To fix this, I added a pair of ¾” strips of plywood to act as spacers. These strips added just enough clearance for the keyboard to avoid hitting the desk, and there is still enough room below the keyboard tray to slide your legs under the desk.
The one consequence of adding these ¾” strips was a bit of interference with the bookcase, and I had to add a notch to the top edge of the bookcase to allow clearance for the strips. That was easy enough to do with the jigsaw, and after a test fit, everything seemed to fit nicely.
Step 12: Final Details On Plywood Cabinets Below Desk

The last bit of hardware to add was a few leveling feet to the underside of the cabinet on the left end of the desk. These leveling feet would allow me to get the desk top level, as well as account for any rocking from our uneven floor.
I mounted threaded inserts to hold the leveling feet and also added some felt pads to the bottom of the feet off camera to keep them from damaging our hardwood floors.
With that, everything was installed, so, finally, I could move on to finishing. I decided to add a little more color to this build by painting the back panel of the bookcase. This is a pretty subtle touch, but I really like the way it ended up looking.
Step 13: Spraying Paint and Finish With HVLP System
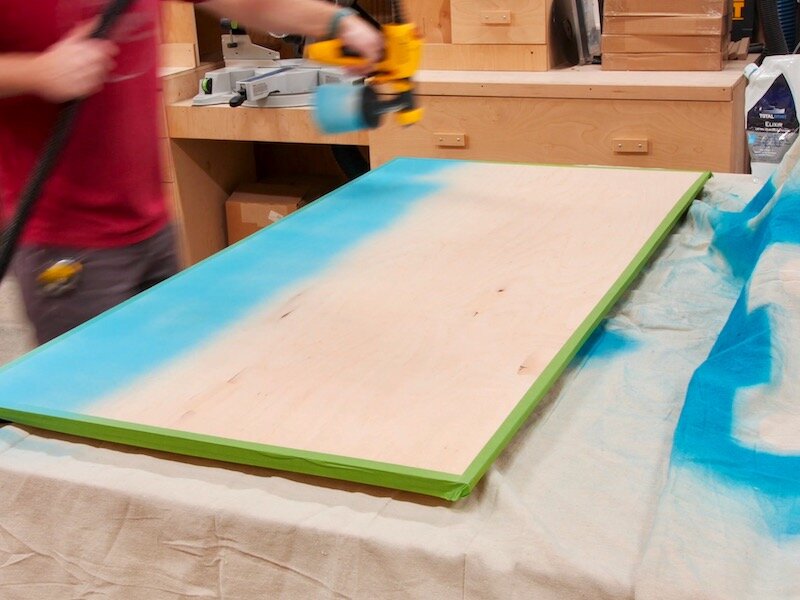
I sprayed on a few coats of TotalBoat Elixir in their Whaler Blue color using the Wagner Flexio again, and I taped off the outer edges of the back panel so I could still add some glue to those areas.
Once the paint dried, I added glue, dropped on the back panel, thankfully with a helping hand this time, and tacked it in place with more narrow crown staples. I sanded the edges flush and also sanded all of the rest of the parts up to 180 grit, then I could add the clear coat.
I sprayed on a water based polyurethane for the clear coat, and I used the larger nozzle on the Flexio for this. The nice thing about the larger nozzle is it also has a larger cup, so I was able to spray a lot more surface area before having to refill the cup. I sprayed on three coats in total, sanding with 320 grit between coats, and I ended up with a really nice surface finish.
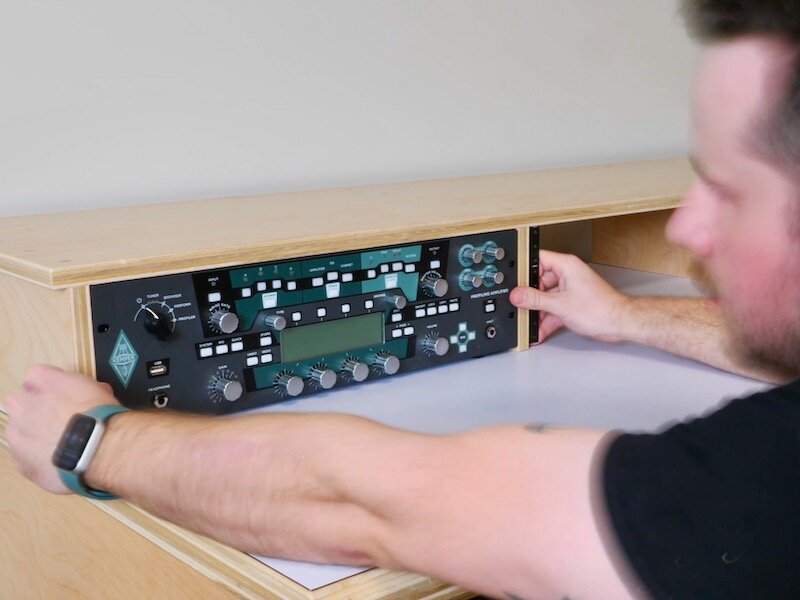
Once the finish dried, I could get everything reassembled before installation. I also added these rack rails to the sides of the monitor stand supports, which will allow me to mount my rack mount gear to the stand.
Next, I reinstalled all of the drawer slide hardware and reattached the drawer fronts. I used some drawer front adjustment screws for this, which have an oversized head to allow you to make adjustments to the drawer fronts. These weren’t really necessary for the drawers with the Blum undermount slides, as they have this kind of adjustment built in, but they were really helpful for the file drawers.
With everything reinstalled and adjusted, I could get everything moved back to the house to get the pieces installed.
Step 14: Installing Plywood Book Shelf As Desk Base

This was the same process as installing the Murphy bed cabinets, so I’m not going to go into a ton of detail. I did once again mis-measure and ended up making the filing cabinet slightly too tall, so it interfered with the window casing. Luckily, I could just add some scraps of trim to the back side of the cabinets to space them off the wall and avoided having to actually trim the casing.
On the bookcase, I also had to cut a hole for the outlet, which I did with the jigsaw, and then I got it attached to the wall using cabinet screws, making sure I was driving the screws into studs. I also attached the front edges of the cabinets together using 1 ¼” screws
Next, I got the desk top positioned where I wanted it and then attached it to the bookcase using 1 ¼” screws from below. Once that side was locked in place, I could get the left cabinet positioned correctly and then attached it to the desk using more 1 ¼” screws.

Finally, I could level the desk top by adjusting the leveling feet on the left cabinet, and the desk was installed.
With that done, I could start getting everything else added to the desk, starting with the monitor stand. The stand isn’t actually attached to the desk top, which allows me to slide it forward easily if I need to access cables from the back of the desk.
Also, hopefully now you can see how some of this rack mounted gear works. I own a Kemper guitar amp as well as a power conditioner, and both of those are rack mounted.

I also added my studio monitors, my ultra-wide curved gaming monitor, and my computer tower to finish off the desk top.
Next, I could get the MIDI keyboard added, which is an Arturia Keylab Essential in my case, and luckily it fits great. I don’t really use most of the buttons on the keyboard and really just wanted access to the keys themselves, and this tray works great for that.
Now that everything was in place, I needed to work on getting power to all of the equipment. Unfortunately, the outlet placement in relation to this desk is pretty terrible, with the only outlets being located inside this bookcase and to the left of the desk.
To help with this, I added one of these outlet-style power strips to the wall under the desk, but I needed to get the power cable over to the outlet in the bookcase.
Unfortunately, this meant I had to drill a series of holes through the bookcase, which left some pretty ragged edges. To help make these holes look nicer, I modeled up a quick grommet in SketchUp and then 3D printed a handful of them, which is a perfect use case for 3D printing. I couldn’t find a grommet like this locally, and the ones I found online were insanely expensive for some pieces of plastic.

For a few bucks of filament and a few hours of design and print time, I created a custom solution that worked perfectly.
The grommets are just friction fit and really gave the holes a much cleaner look.
Next, I could get the wireless charger mounted in the desk top, and thankfully it fit great, actually a little too great. Luckily, after a little work with a rasp, I was able to persuade the charger into place and actually chamfered the front of the plastic a bit to match the front edge of the desk.
Step 15: Nanoleaf Lighting Installation

Alright, in the home stretch now! I knew I wanted to add some kind of lighting to this area, but there really wasn’t much of a surface for a desk lamp. I decided to instead go with something wall mounted, and also a lot more fun than a lamp, and that was in the form of these Nanoleaf Canvas panels. These things are pricey, but they look amazing, they can react to music, and they have a ton of different color modes.
The Nanoleaf panels install with some included Command Strips and then they can be controlled from your phone or with a really cool little remote in the form of a dodecahedron.
With that, all that was left was some aggressive cable management, including some ceiling mounts for my VR headset cables, and then I could finally call this desk project, as well as the bonus room, complete.