
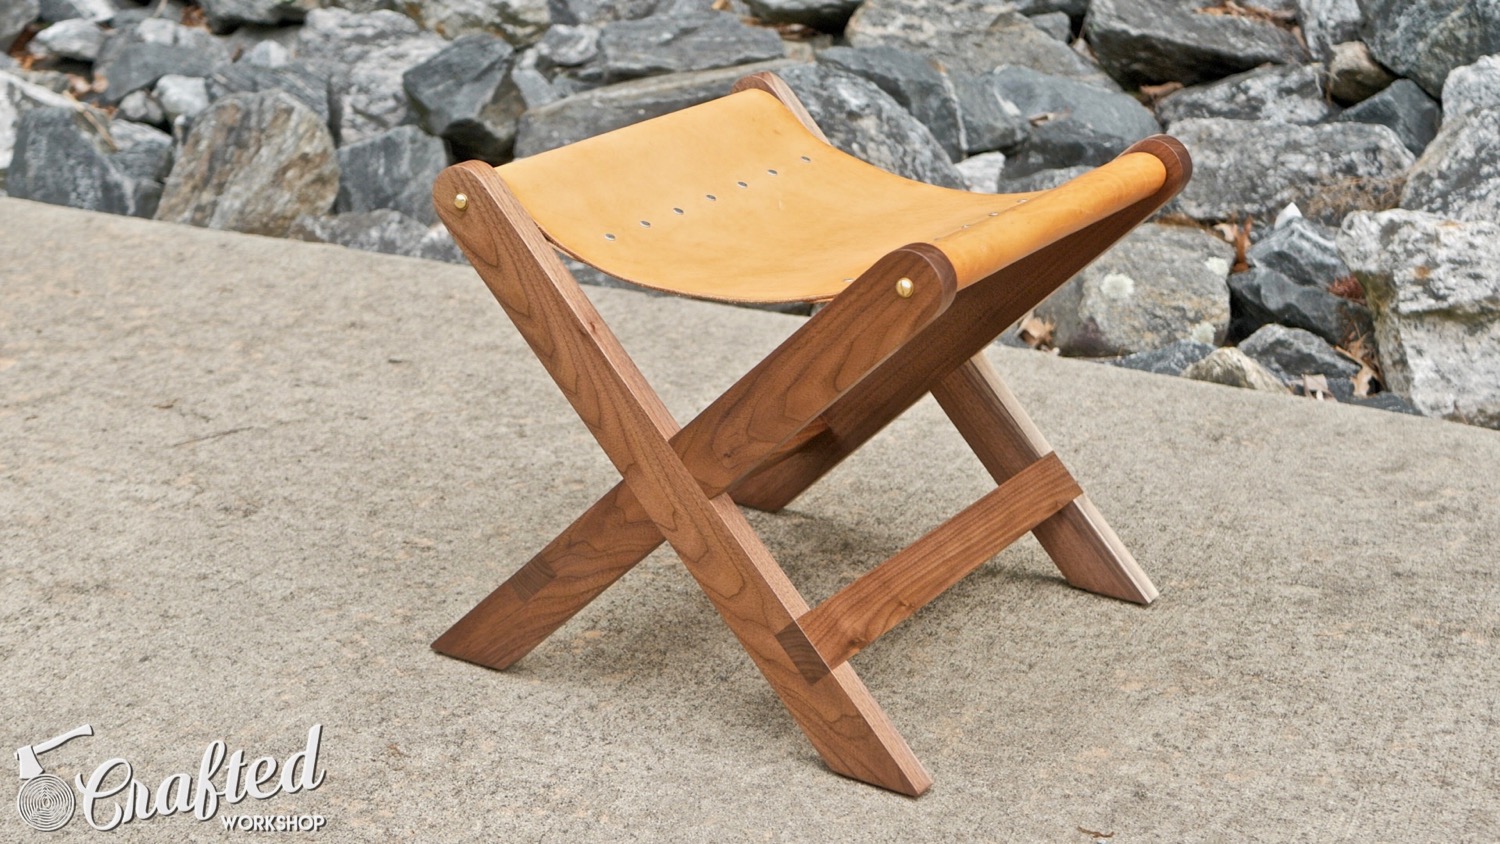
How To Build A Modern Walnut and Leather Stool
In this video, I'll show you how to build a modern Walnut and leather stool. This was a pretty simple build, but I absolutely love the way it turned out. This was my first attempt at leatherwork and certainly won't be my last.
Thanks to Arrow Fastener for sponsoring this build, if you build something similar, make sure to use the hashtag #MadeWithArrow. Learn more about Arrow Fastener!
Materials Used On Modern Walnut and Leather Stool:
The links below are affiliate links, from which I get a small portion of the proceeds. They don't cost you anything and help to support me, thanks!
- 1 8 foot long 1x6, hardwood required (no Pine)
- 1 3 foot long 2 inch hardwood dowel : http://amzn.to/2smOJ2g
- 9 oz Vegetable Tanned Leather Hide, at least 36" by 18"
- 3/16" (5mm) x 1/2" (12mm) Aluminum pop rivets : http://amzn.to/2sMaeu6
- 3/16" (5mm) Aluminum pop rivet washers : http://amzn.to/2sShFjO
- 2" long, 1/4-20 Brass Bolt, 4 : http://amzn.to/2sSk6mi
- 1/4-20 Threaded Inserts, 4 : http://amzn.to/2sMtU0E
- Minwax Wipe-On Poly, Satin : http://amzn.to/2sMckdf
Tools Used On Modern Walnut and Leather Stool:
- RH200S Pop Rivet Gun : http://amzn.to/2sSFMyT
- SawStop PCS 1.75-HP Professional Cabinet Saw : http://amzn.to/2aqqRyn
- Festool Kapex Miter Saw : http://bit.ly/festooldealers
- Powermatic PJ-882HH 8-Inch Jointer : http://amzn.to/2phphdg
- Powermatic 15HH 15-Inch Planer : http://amzn.to/2phKqE9
- Mirka Deros Sander : http://amzn.to/2qXGhHH
- Craftool Round Drive Punch, Size 6
- Craftool Keen Edge Beveler, Size 4
- Multi-Size Wood Slicker
Modern Walnut and Leather Stool Build Process:
I built this project out of rough Walnut that I already had on hand, but I designed this project to work with 1x2s or 1x3s from your local home center. I would definitely recommend going with a hardwood species like Oak or Walnut rather than Pine, just because you’ll need all the strength you can get on this project.
Step 1: Break Down Your Materials & Cut Parts To Length
I started by milling up my Walnut, but obviously if you buy lumber from your home center, you can skip this step. Next, I cut my pieces to size. There are four pieces that make up the legs and two stretchers that connect the legs. The legs are 24 ½" long from the long point of the miter and the stretchers are 18 ⅝" long.
The legs are cut with a 45 degree miter on one end, which creates the foot. I’d definitely recommend setting up a stop block when cutting these so that all of your pieces are the exact same length.
Step 2: Layout Half Lap Joinery & Cut Using Method Of Your Choice
With the pieces cut to size, I started laying out the joinery. The legs are connected in an X shape using half lap joinery. Half laps are a great joint for beginners as they’re easy to create with basic tools yet are extremely strong. Basically, you cut away half of each piece and the two pieces fit together.
To cut my half laps, I used my table saw, but these could be cut using a miter saw that has a depth stop, which most I’ve seen have, or even a circular saw and a speed square. I also cut these with a regular blade to illustrate that you don’t need a dado stack, although that certainly speeds up the process.
I made sure to get my fit just right, taking my time sneaking up on the exact fit, and used a spacer block on my table saw fence to set the position. I also made all of the cuts on each board before moving the fence.
With all of the waste cleared away, you can see how the pieces fit together here.
Step 3: Layout Dado Joinery & Cut Using Method Of Your Choice
With the legs fit, next I needed to cut the dados that will house the stretchers. To make this process quicker and to make sure all of the joints were in the same spot, I taped all four legs together and then laid out the location of the joint.
I set the depth of my blade using the stretcher and then started making cuts, sneaking up on the fit again. Once the fit was right, I cleared out the rest of the waste.
Step 4: Drill Holes For Dowel Bolts & Shape Legs
With the legs still taped together, I went ahead and drilled the holes that the dowels will be attached through later. I needed an extra long drill bit for this and, as luck would have it, the only extra long drill bit I own is ¼”, the size I needed.
I drilled this hole on the drill press to make sure it was straight, but a handheld drill would get the job done.
Next, I cut my dowels to length at the miter saw. This is a 2” dowel that I picked up from my local home center. The dowels needed to be cut to fit between the legs.
With the dowels cut, I traced the outline of the dowel on the legs and then draw a slightly smaller radius with a compass. I wanted the leather to sit below the edges of the legs, which is why I retraced the offset.
Next, I sanded to my line using a oscillating belt sander. A regular belt sander or even a file could get the job done here. I also rounded over the points of the feet while I was at it.
Step 5: Sand Parts & Assemble Stool Base
While the base was still disassembled, I went ahead and sanded everything with 120 grit sandpaper. Be careful here, as removing too much material will make your joints have gaps. I barely went over these pieces and still got some hairline gaps which weren’t there before sanding. Might be a better idea to sand after assembly.
The glue up was pretty uneventful, I just applied glue to both sides of the half laps and added a clamp to each joint. You definitely want plenty of glue in these joints as they’re the only structural support on the chair. After clamping everything up, I wiped away any glue squeeze out.
Step 6: Drill Holes For Threaded Inserts & Install Into Dowels
Next, I needed to drill holes in the center of the dowels for the threaded inserts I’ll be using to attach the dowels to the legs. I learned this trick to find the center of a circle. Draw a few straight lines around the edges of the circle (these are called chords). Measure and mark the center of each of the lines, then use a square and draw a line square to the line. Where these lines intersect is the center of the circle.
With the center found, I drilled the holes using my drill press. I had to start with a smaller bit, since the size I needed for the threaded inserts was too long. These dowels just fit under my drill press. You could certainly do this with a handheld drill if your drill press isn’t tall enough, just keep it as square as possible.
Next, I drilled out the hole to the correct size for my threaded inserts and then installed the inserts. To do this, I threaded a bolt into the insert, added a little CA glue, then threaded the insert into the hole. These are simple to install and are really, really strong. I used 2” brass bolts for the final piece.
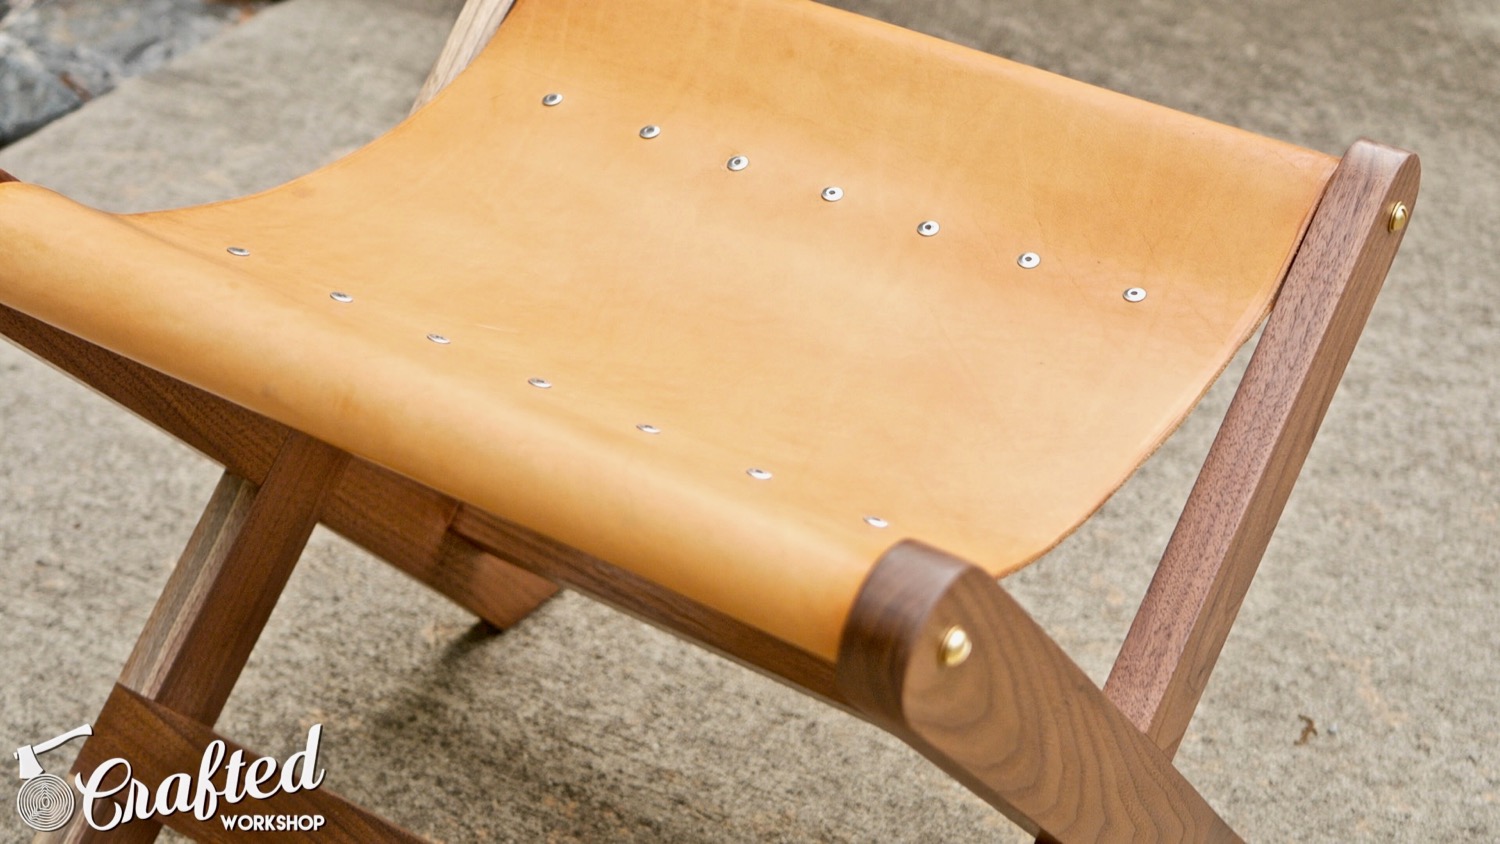
Step 7: Measure For Leather Seat & Cut Leather To Size
With the dowels installed, I measured for the leather seat. I used a piece of string to represent the leather, but in retrospect I didn’t leave enough slack in my measurement and my leather seat ended up to short widthwise later on. I would add at least a few inches to this measurement to make sure this doesn’t happen to you.
I picked up this piece of 9 oz leather from the Tandy Leather store in Atlanta a few weeks ago for the low price of $50. If you’re going to build this, make sure you go with at least 8 or 9 oz leather, anything thinner will have the risk of tearing over time.
To cut the leather to size, I used a utility knife and framing square. My piece ended up at around 31 inches by 16 ½ inches.
Next, I rounded the corners to give the piece a more finished look, again just using a utility knife.
Step 8: Bevel & Slick Leather Edges
To give the edges of the leather a more finished look, I used an edge beveler to add a roundover to the top and bottom edges of the leather. This was one of the most satisfying parts of leather working, watching those curls of leather just roll off, leaving me with a clean edge.
With the edges beveled, I went on to slicking the edges, which really gives them a finished look. It’s super simple, I just dabbed a little water onto the edges and ran this wood slicker over the edge a few times. The friction and moisture cause the edge to get shiny and perfectly rounded, giving the edges a really nice, clean look.
Also, don’t be intimidated by the cost of the leather tools, I think all of the tools I used here were less than $40. Leather working is a great hobby for people with a small workspace or limited tool budget.
Step 9: Glue Leather To Form Loops
With the piece of leather all cleaned up, I laid out the area for the barge cement, which is what I used to glue the leather to itself to form the loops. Make sure to check your measurements here, I accidentally made my leather seat too short during the process and had to switch from 2” to 1” dowels to allow the leather to fit.
I applied the barge cement, adding a thin layer across the entire surface of the areas I had laid out, let it dry for 20 minutes, then clamped it up. Make sure not to clamp your leather too hard, as you will accidentally emboss the surface otherwise.
Step 10: Apply Neatsfoot Oil To Leather
After the barge cement dried overnight, I applied a few coats of pure Neatsfoot Oil, a leather conditioner. I just applied this with my hands, trying to apply an even coat. It goes on extremely dark, and I was really unhappy with how it looked, but after 24 hours it absorbed evenly into the leather and lightened up quite a bit.
Step 11: Install Rivets In Leather Seat
Next, I laid out the holes for the rivets. I wanted them to be evenly spaced and in a straight line, mainly for aesthetic reasons. I spaced them every two inches across the width of the seat. I used a round drive punch to cut the holes for the rivets to go through.
For the rivets, I’m using an Arrow Fastener RH200S Heavy Duty Rivet Tool, along with Arrow rivets and washers, on this project.
Arrow Fastener is the sponsor of this week’s video, and they make a wide variety of fastening tools including staple guns, nailers, glue runs, riveters, and more. I have a ton of projects featuring Arrow tools coming up, so stay tuned!
Step 12: Apply Finish To Stool Base
With the rivets installed, I moved on to finishing the stool, first sanding it up to 180 grit. There were a lot of little corners on this base that made it a little tricky to sand, but one of these sanding sponges really helped clean everything up.
For the finish, I applied three coats of a wipe-on polyurethane, sanding between coats with 400 grit sandpaper.
Step 13: Assemble Stool & Enjoy!
After the finish dried, I installed the seat by threading the bolts into the threaded inserts in the dowels. I’d definitely recommend using a washer beneath the bolt head to help reinforce this connection, since a lot of stress will be put on it.
With the seat installed, the stool was done.

Hopefully you enjoyed this project! If you did, make sure to subscribe to my email newsletter below to be notified of future builds, as well as giveaways and other goodies. Also, don't forget to subscribe to my YouTube channel to catch all of my video content. Thanks!