
How To Build DIY French Cleat Pantry Shelving For Pantry Organization
Have some much needed pantry organization on your to-do list? Learn how to build these DIY French cleat pantry shelves! I replaced our wire shelving with new, adjustable pantry shelving and added LED lighting and storage containers.
Note: The links below are affiliate links
🛠 Tools Used On The Pantry Shelving:
Magnetic Screw Holder (for my impact driver)
HVLP
📦 Materials Used On The Pantry Shelves:

French Cleat Pantry Build Process:
Step 1: Pantry Re-design

First, let’s take a second and look at how our pantry started. Our pantry is relatively small, which means it’s pretty well crammed full of stuff, which means it’s hard to get at the items we need. This is compounded by the fact that the wire shelving the previous owner installed wasn’t adjustable in any way, and all of the shelves were spaced apart the same distance.
Some of the main things I wanted to accomplish with this pantry makeover was
Making the shelving adjustable
Adding some kind of lighting, since there were no lights in the pantry
Getting the pantry more organized, so we can actually find the things we’re looking for
When trying to come up with a mounting system for these pantry shelves, I first considered using shelf standards, and I still think that would have been a good option. These systems are inexpensive, the shelves are extremely strong as long as you install the uprights correctly, and you could complete the entire project in a weekend.
One reason I didn’t go with this system is it would have made for a pretty boring video, but I also wanted to avoid doing a bunch of patching and painting in our pantry, as removing the existing shelves left a bunch of holes in the wall.
I also wanted to be able to further customize my shelves, having varying depths and adding an area for hidden lighting.
For these reasons, I ended up going with a French cleat system, which was heavily inspired by Frank Howarth’s pantry organization series he published a few years ago.
Step 2: New French Cleat Design

The first step in building this project was taking some measurements and designing my shelves and brackets in SketchUp. This not only helped me visualize the space, but it also helped me decide on the cleat spacing. I figured I didn’t need the adjustments to be super granular, as long as the shelves could be moved a few inches up or down, so I spaced the cleats roughly 3 ½” apart.
After figuring out my spacing, I went ahead and cut the cleats from some ¾” plywood, and I was actually able to use some long plywood offcuts from a previous project for this.
Step 3: Start Milling Parts For French Cleats

When I make my French cleats, I first rip strips that are twice as wide as the cleats I want, and then come back and rip them in half with my blade tilted to 45 degrees. This gives me perfectly even strips and allows me to cut them extremely quickly.
The only real trick here is to make sure the fence is set correctly, and this was easily accomplished with a little test cutting.
Once I had this dialed in, I ripped all of the cleats, using a featherboard to help keep the boards against the fence, and then I came back and knocked off that sharp edge on the cleats by running them through the table saw one more time. This is a lot easier than sanding all of the cleats individually and makes them a lot nicer to work with.
As I mentioned, I used ¾” plywood for the cleats, and I used ½” plywood for the backer panels, and next I cut the ½” panels to size using my track saw and table saw. I used this same combination on my French cleat wall here in my shop and it’s been holding strong for years now. Also, since the depth in our pantry is so limited, saving that ¼” of depth wasn’t insignificant.
Step 4: Installing French Cleats To Plywood With Arrow Brad Nailer

Before attaching the cleats to the panels, I sanded the panels just to remove any scuffs from handling them, and then I laid out the cleat spacing on the panels. I started the cleats about 12 inches from the bottom edge of the lower panel, as I knew we’d be storing larger items on the floor, and then I marked out the spacing moving up the panel.
To attach the cleats to the panels, I used 1” brad nails and glue, and I once again called upon my Arrow PT18G brad nailer and Arrow brad nails, just like I did when I built the French cleat system in my shop a few years ago. Also, did you know you’re supposed to oil your pneumatic tools? This is something I somehow didn’t know until very recently, and so I added a few drops of oil to the nailer, the first bit of oil this nailer has seen, before getting started.

Next, I got the cleats attached, spreading on a bead of wood glue with a silicone brush and then tacking them in place with the brad nailer. The wood glue really provides the strength here, and the brad nailer is really just providing clamping force while the glue dries.
I also used a drywall square to help ensure the cleats were square to the panel, and just worked my way up the first panel, adding cleats at my marked locations.
One other thing to mention is that I made these panels about an inch wider than they needed to be, so I could trim them to final width later. This also meant I didn’t need to be super careful with aligning the cleats with the edges of the panels, which just made the assembly process a lot easier.
Step 5: Glue Clean Up Behind French Cleats

After attaching the cleats, I came back with a straw to remove any squeeze out where the cleats met the back panel, and this squeeze out could keep the shelves from seating on the cleats fully if not removed.
I repeated the same process on the top panel, which only got a handful of strips and is mostly just for looks, to cover the wall behind the shelving.
Step 6: Making Shelf Brackets With CNC

With that, the panels were done for the time being, so I could move on to making the shelves themselves. I started with the shelf brackets, which I once again designed in SketchUp. I then exported the bracket design as a DXF and then imported that into Easel, Inventables’ free design software, so I could cut the brackets on my X-Carve.
I was able to use some smaller plywood offcuts for these brackets, and I was also able to nest them so I could reduce my cut time and the wasted material significantly.
Each set of four brackets only took about 12 minutes to cut, so I was able to cut the brackets for all 5 shelves in a little over an hour.

Also, if you don’t have a CNC, my friend April Wilkerson just started producing ¼” MDF templates for projects like these, so that you could make brackets for yourself with a router and flush trim bit. I’ll have some templates for these shelf brackets for sale on my website in three different sizes, if you’re interested in those. I’ll also be adding a PDF version of this bracket design to my website, so you could print the template and cut these brackets with a jigsaw instead.
Step 7: Router Table Clean Up
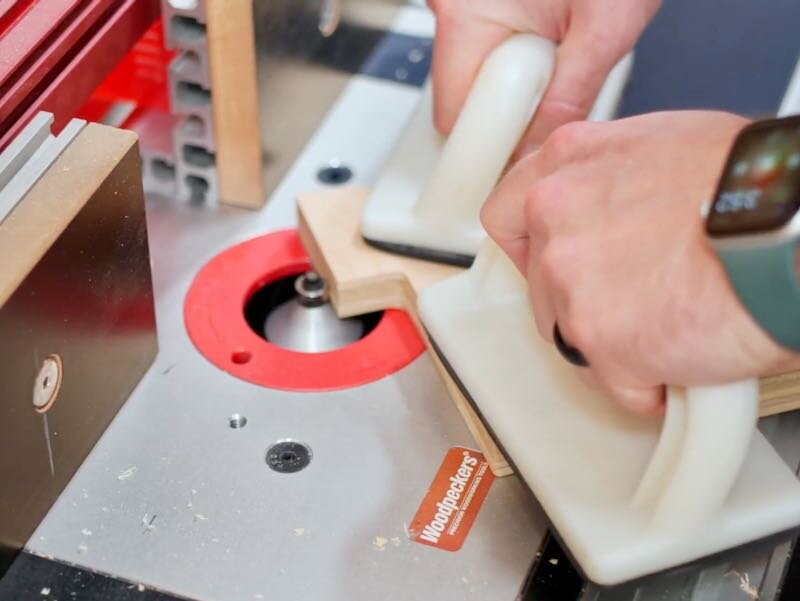
Anyway, after cutting the brackets, I cut the tabs holding the brackets and then I could clean up the tabs by adding a chamfer on the router table. I really like doing this where possible, as it saves me the hassle of removing the tabs by combining it with adding an edge profile.
Step 8: Cutting Dados On Table Saw

With that, the brackets were good to go, so I could move on to making the shelves. I actually cut the shelves while I was filming the X-Carve running, so you’ll just have to imagine me cutting some 60” long rectangles on the table saw, and next I needed to add some dados to the bottom of the shelves to house the shelf brackets.
I set up my dado stack to 23/32” wide to match the ¾” plywood, and then I set the height to ¼” above my Rockler crosscut sled, which I used to hold the shelves while I cut the dados.
I set the fence so that the first dado would start about an inch from the ends of the shelves, and then, after confirming the fit and spacing, I cut a dado into both ends of each shelf, flipping the shelf around 180 degrees between passes.
Once those dados were cut, I moved the fence again, to cut another dado about ¼ of the total width of the shelf in from the edge. Once again, I was able to cut the dado then turn the board 180 degrees to cut the other dado, ensuring they were symmetrical.
After cutting the dados for the brackets, I repositioned my dado blade and fence to cut a rabbet for the cleat itself. I made this rabbet ½” deep and kept the same dado stack width and cut the rabbets on the back edge of all of the shelves.
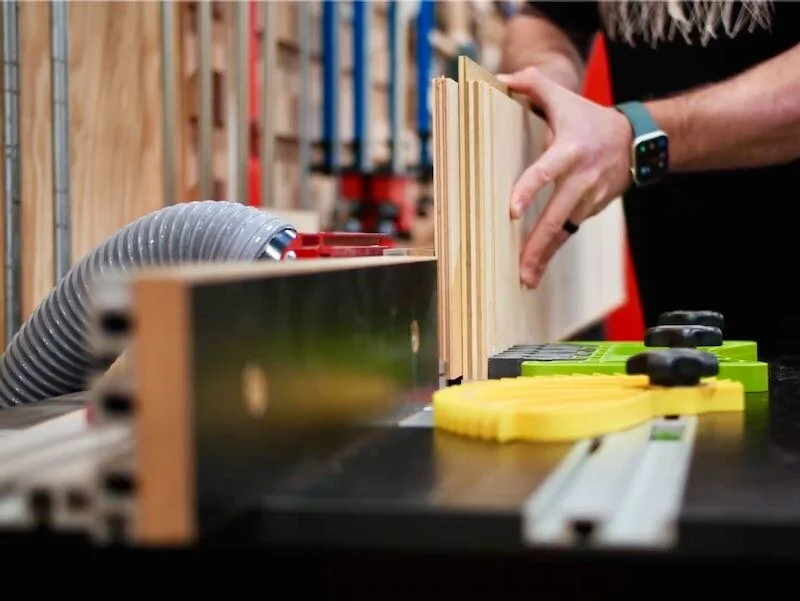
Step 9: Milling Edge Banding For Plywood Shelves

I wanted to add a little visual pizzaz to the front edge of the shelves, as well as make them a little more hard wearing, so I decided to add a strip of maple edge banding. I milled a scrap piece of maple square at the jointer and then resawed a few strips at the bandsaw.
Next, I milled the strips to thickness using the planer and drum sander, and then finally ripped the strips in half, again at the bandsaw.
To attach the strips to the shelves, I used wood glue along with a bunch of these Rockler Bandy Clamps, which are the perfect tool for adding hardwood edge banding like this. I much prefer hardwood edge banding over iron-on edge banding personally, as it allows me to still add an edge profile later.
One thing I didn’t consider when adding this edge banding was that I wouldn’t be able to use my typical flush trim bit on the router to trim the edge banding flush, since the bit would run into dados on the bottom of the shelves. To solve this, I cut some little filler pieces and glued them into the dados, essentially turning them into stopped dados. These filler pieces just gave the flush trim bit something to ride against.

I also went ahead and trimmed the excess edge banding from the end of the shelves while I was at it, using my flush trim saw.
Next, I could set up my router table to trim the edge banding. I typically use my trim router with an attachment to accomplish this, but my trim router was at home, so I had to improvise.
I added an auxiliary fence to the router table fence, which would help to support the tall shelves, and I set this fence off of the table about ¼”, to allow the proud edge banding to run under the fence. I only needed to do this on the infeed side, since the edge banding would be flush when it arrived at the outfeed side.
I flushed up the bearing of the flush trim bit with the router fence using a straight edge, and then, after adding a few featherboards, I was ready to flush trim.
All in all, this worked extremely well, with the added bonus of collecting the dust during the flush trimming. I’ll most likely be using this setup in the future with any boards that aren’t too unwieldy to run across the router table like this.
Step 10: Sanding Pantry Shelves
After flush trimming, I sanded all of the shelves, along with the shelf brackets, with 120 grit sandpaper to get them cleaned up, and then I went back to the router table to chamfer the front edges of the shelves. I added a light chamfer to the bottom edge of the shelves, just to break the edges, but I added a heavier chamfer to the top edge, raising the chamfer bit until the chamfer lined up with where the edge banding and the plywood met up. This essentially makes the edge banding disappear and I really like the final look.
The last thing to cut before assembling the shelves was yet another groove, and this groove houses the LED strips I added under each of these shelves. I added some enclosures for the strips, which you’ll see later, so I cut the grooves to fit those enclosures and I started the grooves about ¼” from the front edge of the shelves.
Step 11: Assembling French Cleat Shelves With Arrow Brad Nailer

Finally, after all of that work, I could actually assemble the shelves, which went smoothly with all of those dados and rabbets. First, I glued the French cleat into the rabbet on the back edge of the shelf, tacking it in place with my Arrow brad nailer.
Next, I could add the brackets, which butt up against the French cleat. I added glue to the dados and then clamped the brackets in place using these sweet new gear clamps I just got from Pony Jorgensen, which have a ton of holding power and can be added super quickly.
Finally, I added a screw through the back of the French cleat, into the shelf bracket, just to lock them together.
After assembling the first shelf, I test fit the shelf onto the panel and, thankfully, it fit perfectly. As you can see, there is enough clearance on the shelf bracket to allow the shelf to be lowered onto the cleat, and the bracket rests against the wall, giving it a ton of strength.
I would love to actually strength test one of these shelves, but I don’t want to break the shelves I just built. Maybe in a future project.
Anyway, with the fit confirmed, I assembled the rest of the shelves and then let the glue dry overnight.

The last step on the shelves was to trim the cleats flush with the ends of the shelves, as I once again left them longer than they needed to be to allow me to trim them flush after assembly. I called on the crosscut sled again for this, and it made quick work of the task.
I also went ahead and trimmed the French cleat panels to width while I was at it, trying my best to avoid the brad nails in the panels but, of course, failing to miss them all.
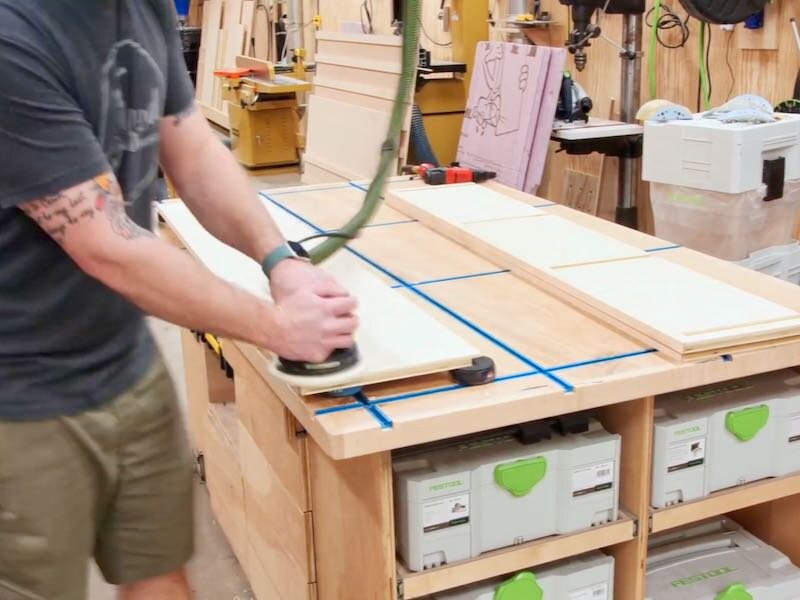
Step 12: Applying Finish To Pantry Inserts

Finally, with everything trimmed to size, I sanded everything up to 180 grit, which required a good bit of hand sanding due to the curves on the shelf brackets.
I debated on whether or not I even wanted to finish these shelves, but I figured they’d be a heck of a lot easier to clean up if we spilled something on them if they were finished, so I went ahead and added some Halycon Clear from TotalBoat, which is a super durable marine grade finish that sprays really nicely. I sprayed on a few coats, letting it dry about an hour between coats, and then I could get the panels installed.
Step 13: Demolition Of Old Wire Frame Pantry Shelves

Of course, before installing the new shelving, I needed to remove the old shelving, which was actually kind of a cathartic experience, since I hated this wire shelving so much. Whoever thought adding bars across the front of these shelves was a good idea should not be a product designer.
The shelves just popped off of the brackets and, after removing them, I needed to remove the brackets from the wall. These are actually held in place with nails, which expand the plastic inside the wall, providing more hold on the drywall.
If you remove these nails first, the brackets remove a lot more cleanly, and the nails are easy to pry out with a 5-in-1 tool and a pair of pliers.

After removing the brackets, I marked out the stud locations on the wall, which of course none of the wire shelves were actually mounted to, and then I could transfer those measurements to the French cleat panels.
I added a completely overkill number of 2 ½” screws to those locations, trying to get the spacing nice and even so the screws would look nicer, and then I brought the first panel inside for installation, which is when I ran into an issue.
Step 14: Installing New Pantry Shelves

I realized the full panel would not fit through the door way of the pantry.

After thinking about the issue, I figured that the easiest thing to do would be to crosscut the panel and then just attach the two separate pieces, keeping the seam between them as tight as possible. To do this, I used my track saw table, which has definitely proven to be handy here at the home shop.
After trimming, thankfully the panel fit, so I could get it mounted to the studs, also making sure it was level. This bottom panel actually starts at the top of the baseboard, so it was easy to rest it on the baseboard while getting it level.

Once the first panel was attached, I came back and added the cutoff strip and, honestly, you can barely even tell there’s a seam between the two pieces in the final install.
I repeated the same process for the upper panel, which you can see runs high to cover the wall, and then I could work on the lighting.
Step 15: LED Lighting Installation In New French Cleat Pantry

First, I needed to get some power into this pantry and, thankfully, there was an outlet on the other side of this wall. I cut a hole for an outlet box in the wall in the pantry, which was unfortunately next to impossible to film, and then I could remove the outlet on the other side of the wall to add another length of Romex to the circuit.
Now, obviously, if you’re not comfortable with electrical work, you should have an electrician do this, but this is a super simple way to add an outlet near where you have an existing outlet. Also, since I was just going to be adding a few LED lights, I knew this wasn’t going to overload this circuit.

After getting the new outlet installed in the pantry, I checked the wiring with a tester to make sure everything was good, which it was, and then I could start getting the LED strips added to the shelves. I actually came up with a pretty cool system here for adding lighting to shelves like these without having to do any soldering, and hopefully you’ll find it useful.
First, I marked the length of the shelf on one of the enclosures I used, which I’ll link to in the video description along with all of the other tools and materials I used, and I cut the enclosure and diffuser to length at the miter saw. The enclosure is aluminum, so it cut fine with a standard miter saw as long as I took it slow.

I didn’t have any screws short enough to attach the enclosure to the bottom of the shelf, so I used some carpet tape instead, but this hasn’t held up well over time, so I’d recommend finding a better adhesive or short screws if you’re going to do this.
As you can see, I actually added these ½” self tapping screws, but they poked up through the top of the shelf a bit, so I removed them after this.
Next, I cut a length of LED strip to fit on the bottom of the shelf, and these types of strips have specific places where you need to cut the strip, otherwise you’ll short the circuit and some of the lights won’t work.
To wire the lights, I used some low voltage wire, and to attach the wire to the light strips, I added these little clip-on pigtail adapters, which have contacts that connect to the copper areas on the light strips.

After attaching the pigtail, I peeled off the backing on the LED strip and attached it to the enclosure, and I’ve found the adhesive on these particular LED strips to be super strong over time. Once again, I’ll link to them in the video description.
These enclosure strips came with end caps, to keep the light from leaking out of the ends of the enclosures, so I added caps to both ends, running the pigtail through the cap with the hole in it.
To extend the pigtail to a useable length, I added some crimp-on connectors between the pigtail and a length of low voltage wire, and this allowed me to extend the wiring as long as I needed without soldering. These crimp-on connectors have built-in heat shrink tubing, and evidently they’re waterproof if installed correctly, definitely plenty durable for this application.

Finally, to route the wire along the edge of the shelf and add a little strain relief for the crimp-on connectors, I stapled the wire to the side of the shelves with my Arrow T50ACD electric stapler. Just be careful when doing this, as you can short the circuit if you drive in the staple too far and damage the plastic housing, and ask me how I know this.
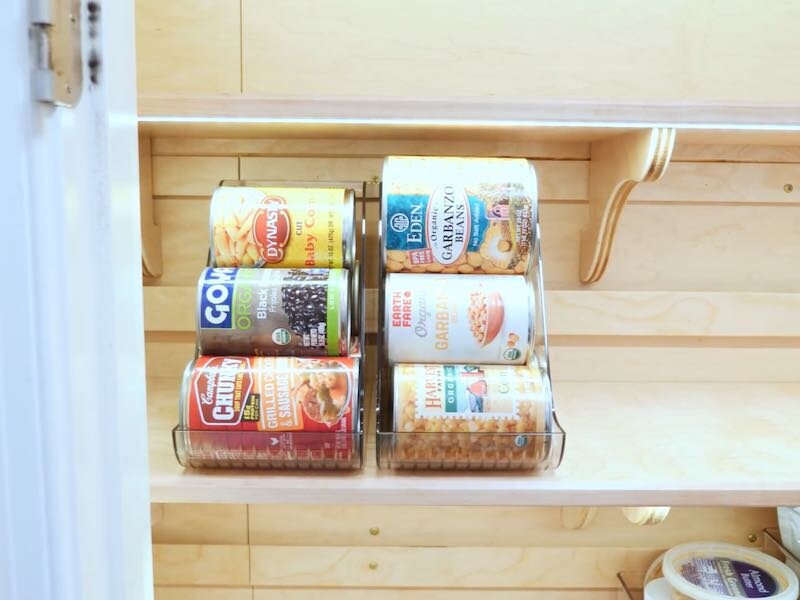
Step 16: Stocking French Cleat Shelves In New Pantry
With that, the shelves installed easily enough, although they were a pretty tight fit in the pantry. I did have to move some shelves around to get the last shelf in, and I should have started from the bottom and worked my way up in retrospect, since the topmost shelf is about 3 inches shallower than the rest of the shelves.
Anyway, after the shelves were in, I could tie all of the wires together and attach them to the power supply that came with these LED strips, and I just attached the wires with a wire nut, and then lights were working perfectly.
I also added one more strip on the inside wall of the pantry off camera, to light up that top shelf, and I also ended up using two power supplies just to be on the safe side, since the LED strip instructions claimed each power supply could only run a certain length of strips.

Finally, I added a plug-in motion sensor between the outlet and the strips, so the strips would turn on and off automatically when we opened and closed the pantry doors, and then I could do some cable management to tidy everything up.
Luckily, the low voltage wire running from the LED strips could run along the wall, in the gap between the edge of the French cleat panels and the wall, and you really can’t see any wiring except the wire for the motion sensor in the final install.
Finally, I could get the pantry loaded back up and reorganized with some handy containers I picked up on Amazon and, after some super satisfying labeling, I could call this pantry project complete.
