
How To Install An Automated Dust Collection System
I set up a fully automated dust collection system in my new shop using iVac blast gates, the new Clearvue EF5 dust collector, and Nordfab duct work! Shop tour video next week, so stay tuned!
Note: The links below are Amazon affiliate links
📦 Automated Dust Collection Parts:

Pin it!
Process For Creating Perfect Dust Collection In Your Shop:
Step 1: Purchase and Assembly
Paul and James from Clearvue came out to my shop to help me with getting their new EF5 duct collector installed, and we got started by unpacking the unit and starting to get it assembled.
If you saw my previous dust collection video from a couple of years ago, you know I’ve been using the Clearvue CV1800 for the last few years and it has worked great for me. This EF5 unit is essentially an all-metal version of the CV1800 and it has the added benefit of being much easier to assemble.
After Paul got the motor plate assembled, I went ahead and wired up the motor with a whip, wiring it according to the instructions from Clearvue.
Step 2: Ductwork

With the unit partially assembled, we moved on to unpacking the ductwork and laying out the initial run coming from the duct collector. I went with Nordfab ducting this time around, and they are not a sponsor of this video by the way, I paid for this ductwork out of my pocket.
Nordfab is unbelievably expensive but is also incredibly high quality and, most importantly, easy to assemble and make adjustments. I figured this should be the last ductwork system I ever need to purchase, so I think the investment was worthwhile.

The main advantage to Nordfab ducting is their quick fit system, which uses ring clamps to hold the different pieces together. This creates an airtight seal that is incredibly secure but easy to make adjustments to if needed.
When you close the clamps for the first time, it’s best to pre-stress them by slowly working them open and closed. This just makes it easier to close the clamp when you’re connecting two pieces of ducting together.
When laying out this initial run, we made sure we had one full section of straight pipe coming off of the dust collector. This helps to reduce the turbulence in the air coming into the dust collector and improves the efficiency of the machine.
After the straight section, the line makes two 90 degree turns to raise the ducting to about 10 feet above the ground, so that it’s up and out of my way, something I really struggled with at my old shop. Also, I should mention that all of the 90 degree turns are longer 90s, so they don’t restrict the airflow.

Before mounting everything to the wall, we checked to make sure we had clearance from the wall for this section of ductwork, and this also determined where we mounted the dust collector.
Step 3: Mounting the Dust Collection System

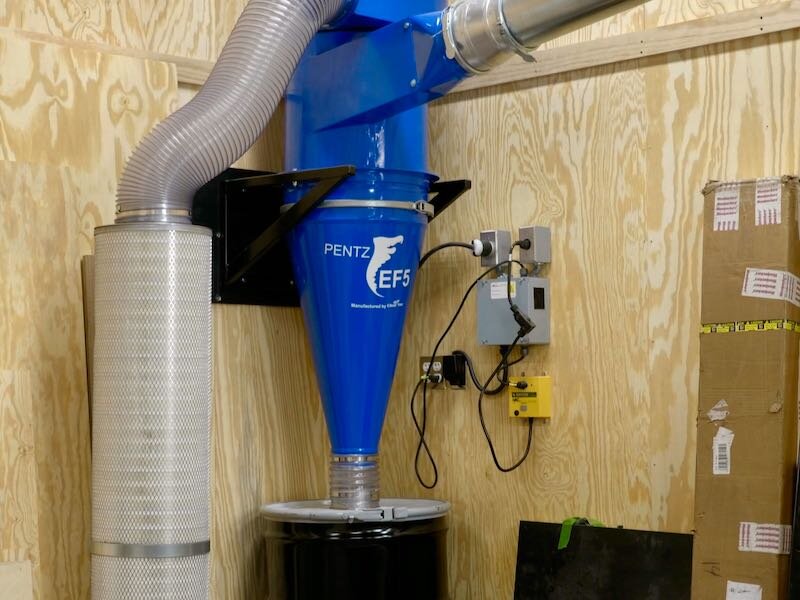
Next, I could get the dust collector mounted to the wall. First, I installed this wooden mounting panel that Clearvue supplied into the studs. With that attached to the wall, I could then attach the metal mounting bracket to the panel using lag screws.
While this mounting bracket isn’t mounted into the studs, that’s just where the dust collector had to go, the lags are still grabbing over 1” of wood and, as you can see, it can easily hold me.
With the bracket in place, we could get the first part of the cyclone mounted. Another nice thing about this metal dust collector is that the unit can be assembled in place, so you don’t have to try and lift the whole thing onto the bracket in one go.
After getting the first section in place, I could add the impeller housing on top of that, placing a rubber gasket between the two parts to create an airtight seal.
Next, we could lift the beast of a motor into place, which was a little awkward with the impeller attached. Once it was in place, I bolted it down to secure it.
Finally, we could clamp on the cyclone and the main portion of the dust collector was pretty much assembled.
Before moving on, I went ahead and wired up the contactor, which powers the system and allows the system to be remote controlled.
Once that was wired up, I mounted it onto the wall, along with the iVac switch which I’ll use to control the system, and then we could fire the dust collector up for a second to make sure the impeller was spinning in the right direction, which it was.
Step 4: Mounting the Ductwork

With the dust collector working, we could move on to getting the ductwork mounted. This would have definitely been next to impossible by myself, and I am extremely thankful to the guys from Clearvue for coming out to help me with this process.
With Paul and I up on ladders, James could use a deadman to keep the section of ducting elevated while we worked on securing it. We used plumbing strapping to secure the ductwork to the wall and ceiling, and all of the different hole locations on the strapping make it really easy to adjust the height you’re mounting the ducting.
We were having a little bit of a clearance issue based on the angle the ducting was coming off the dust collector, so we removed one of the mounting bolts from the unit, which allowed us to turn the whole system slightly to get us off the wall a little bit further.
Once that was done, we made more fine adjustments to the different angled pieces to make sure we were running level, and then we could get the first drop mounted. This is the drop for the jointer and table saw, and the jointer has a 6” port and the table saw has a 4” port.

We added more strapping to hold this drop in place, and I also temporarily added the blast gate to make sure I had clearance off of the wall. This strapping was also temporary, as I came up with some more elegant mounts for the vertical drops, which I’ll show a little later.
With the first drop done, we continued on down the line until we got to the next branch, which was for the planer and drum sander.
This was also the first section where we needed to cut one of the straight sections to length. To do this, I used my portaband, although a reciprocating saw or hacksaw would also work here.
After cutting the pipe to length, I filed the edges to remove any sharp burrs, and then we could assemble that run.
Since the flange at the end of the straight section was cut off, we needed to use an adjustable nipple to mount this section to the rest of the run. There is an o-ring that basically replaces the flange and this system gives you about a foot of adjustability, which is really nice.

To mount this branch, we once again used more plumbing strapping, but we had to attach it to the ceiling this time. One of the acoustic panels I built in a previous video was actually in the area we needed to mount the strapping, but we just used it as one of our mounting points, which actually made things a little easier since we didn’t have to drill into concrete.
After mounting the branch, we assembled the rest of the drop, which ends with a 4” port for the drum sander and 6” port for the planer.
Next, we continued on down the line to the end of the first run, which ends in a drop for the bandsaw. My bandsaw has two 4” dust ports, so this run ends with a 6” to two 4” wye.
The last section to mount was the branch for what was originally going to be the table saw, but I’ve decided to make it a branch for the miter saw and router table insert instead. Once again, we mounted this branch using strapping and once again had to mount it to one of the acoustic panels.
Step 5: Finalize Dust Collection Assembly

With all of the ductwork in place, we could finish up assembling the dust collector. The next step was to get the filter stack assembled. This part is the clean out, which is removable and allows you to remove any excess dust from your filter stack.
Next, we attached this flange to the upper filter, applying a bead of silicone then attaching the flange with screws.
We could then wrestle the flex hose that connects the dust collector to the filter stack onto the flange, which was kind of a pain, but we eventually got it on there.
Once that was in place, we stacked the two filters, applying another bead of silicone between them, and then clamped them together.

Before attaching the filters to the dust collector, we also added the dust bin, which is a 55 gallon drum in this case, which connects to the bottom of the cyclone with another short piece of flex hose.
We could then attach the filters to the dust collector, which was another tight fit, and then the only thing left to do was to apply the decal to the cyclone.
By the way, if you’re interested in purchasing one of these units or anything from Clearvue, you can use my coupon code CRAFTED for 5% off, and I also get a small commission when you make purchases with that coupon code.
Clearvue is a great company, their products are high quality and American made, and I definitely recommend checking them out if you’re looking to upgrade your dust collection system.
With that, we could fire the dust collector up and test it out and, let me tell you, this thing sucks.

Once I had all of the blast gates attached to the ductwork, I could get the tools connected with flex hose.
Step 6: Connecting Tools with Flex Hose

At the drum sander, I went with a length of flex hose with one of Rockler’s Dust Right handles on the end. On the drum sander, I have a Dust Right fitting, and this allows me to quickly remove the hose from the drum sander when I need to change the sandpaper.
Over at the miter saw, I decided to add another dust collection port since I’ve never been that satisfied with the dust collection there. I wanted to add a large dust hood, but first I needed to cut out an area for the dust hood.
I used a combination of a jigsaw and Japanese pull saw for this, and it was a little tricky working around some of the existing parts of the miter saw station. I also had to cut through this cross support piece, which I again did with the pull saw.

The edges of the hood have a beveled edge, so I used a spokeshave and rasp to try and match that bevel as best as I could.
Once I had a good snug fit, I added some silicone and dropped the hood into place, then added a bucket of screws to hold it in place while the silicone dried.
I hooked it up so the flex hose runs behind the cabinets along the floor to the blast gate.
I also wanted to create a mounting bracket for the flex hose at the table saw, so that I could store it when it wasn’t in use to get it out of the way. Rockler sells this little bracket kit and I whipped up a quick mount for it.
I got it mounted to the wall and then mounted the plastic fitting that holds the Dust Right handle in place.
Next, I mounted a Dust Right handle on a length of flex hose then mounted the other end to the ducting. This was actually before I added the blast gate here, but I think you get the idea.
With the hose mounted, I could mount the straps which hold the hose in place against the wall, and then I mounted brackets for the floor sweep and bench nozzle.
The rest of the tools just connected with regular flex hose, so after that was done, I could move on to adding the tool sensors for the iVac system.
Step 7: iVac System

These sensors detect the current running through the cord of the tool and send a signal to both the associated blast gate and the dust collector switch when it senses the tool has been turned on or off.
The sensors just screw onto the cord and then you can make sure it’s working correctly by checking to see if the red LED flashes when you turn the tool on and stops flashing when you turn the tool off.
To program each sensor to match the blast gate, there are a series of dip switches which need to be set at each tool.
After everything is programed, you can test out the system by turning your tool on and watching as the blast gate opens and the dust collector turns on. It’s a pretty awesome feeling when you get the system up and running for the first time and I can honestly say I would never have a dust collection system without this iVac system in place now that I’m used to using it.
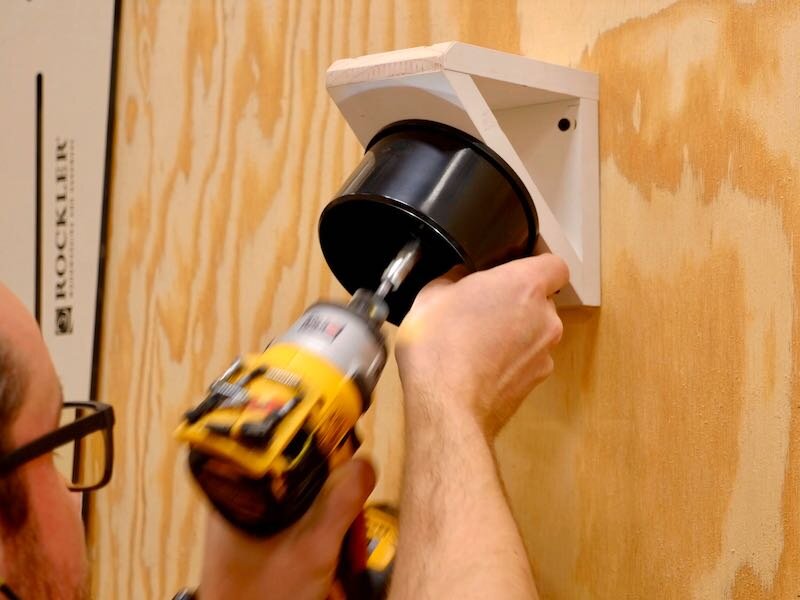
Step 8: Custom Mounting Brackets

The last thing to finish up was a few custom mounting brackets to help secure the vertical drops. They had a tendency to angle away from the wall due to the negative pressure in the system pulling the ducting towards the flex hose, and I figured a little extra security is always a good thing.
I worked up a quick design in SketchUp and then exported an SVG into Easel, Inventables’ free software, and then I could get to cutting the parts with the X-Carve.
These kinds of custom parts are really where the X-Carve excels, as I can cut the exact same part multiple times and know my dimensions are going to be perfect. I’ll have a link to the X-Carve in the video description below if you want to learn more.

Unfortunately, I zeroed my bit on the scrap piece of plywood instead of the actual part on this first cut, so I had to flip this piece and redo it, but this whole process went extremely quickly. I think each of these parts took about 4 minutes to cut.
Also, I’m loving this t-track system, it makes repetitive parts like this super simple. I could just unclamp two clamps, swap the piece of plywood, making sure it was butted up against the corner stop, and run the program again.
While the X-Carve was working, I cut up the other parts for the brackets, starting at the table saw with the backer pieces. These are the pieces which I’ll mount to the wall, and I cut these strips to match the width of the back end of the u-shaped pieces.
Next, I squared up some of the offcuts from the u-shaped pieces, which I wanted to turn into triangular supports for the brackets. After squaring them up, I taped the pieces together, drew a diagonal line through the middle, and then cut the pieces in half at the bandsaw.

I cleaned up the edges I cut with the bandsaw at the oscillating belt sander, and then removed the tabs from the u-shaped pieces with a flush trim bit on the router table.
Assembling the brackets was super simple, I just used glue and 1 ½” brad nails. I would set one of the u-shaped pieces up on a few pieces of plywood to set the spacing, then add glue to the ends of the piece. I could then tack the strips in place with a few brads.
Next, I added glue along two edges of the triangular pieces and then tacked those in place. The nice thing about this design is that it squares itself as long as your cut edges are square.
After assembling the rest of the brackets, I pre-drilled some holes for Powerhead screws and then partially drove in the screws before getting up on the ladder.
Once I was up there, I realized there was some interference with the quick clamp, even though I had left some extra room at the front of the u-shaped pieces. I ended up having to scribe these brackets and notch out the brackets with the jigsaw, which went quickly but is something I wish I would have caught before cutting all of these parts, so I could have made the same cutout on each bracket with the X-Carve.

With the bracket notched out, I could attach the bracket to the wall, which held up the ducting nicely, and call this dust collection system complete.