How To Build A Live Edge Axe Throwing Target with CNC Inlay Bullseye
This live edge axe throwing target is definitely among the most ridiculous projects I've built, but it was also super fun. While I don't expect most of you are going to build one of these, there are still a ton of woodworking techniques in this video that would apply to all kinds of different builds. Enjoy!
🛠 Tools Used On The Axe Throwing Target (affiliate):
📦 Materials Used On The Axe Throwing Target (affiliate):
Live edge Maple slab, ~30" x 30"
Cedar (for inlay)
This project has been on my to-build list since this past summer, when I realized I was terrible at throwing axes.
Step 1: Choosing Materials
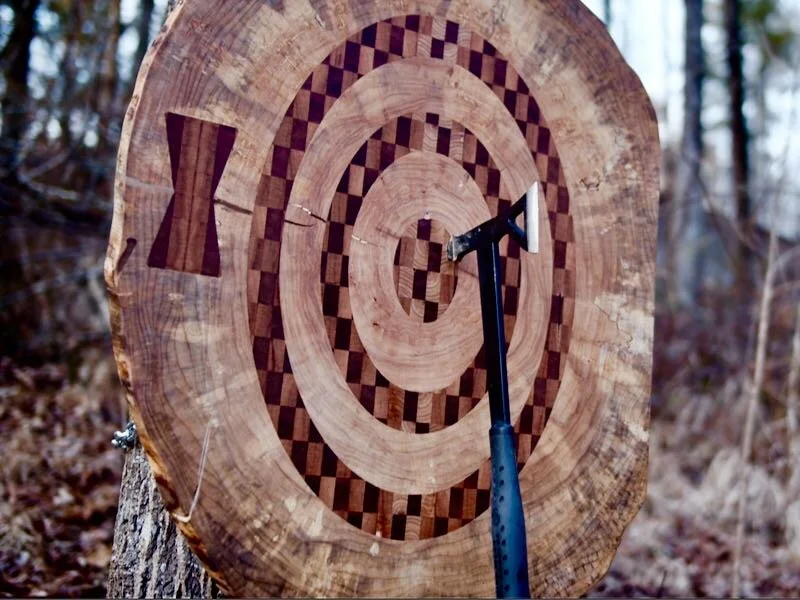
Now, I could have built a simple target out of some dimensional lumber and called it a day, but I decided to go way, way overboard and build a target out of a live edge Maple cookie slab. One benefit to using a slab like this is that it’s all end grain, so the axe will have a better chance of sticking to the target and the target will also take abuse a lot better than a long grain target.
Step 2: Flattening Slab
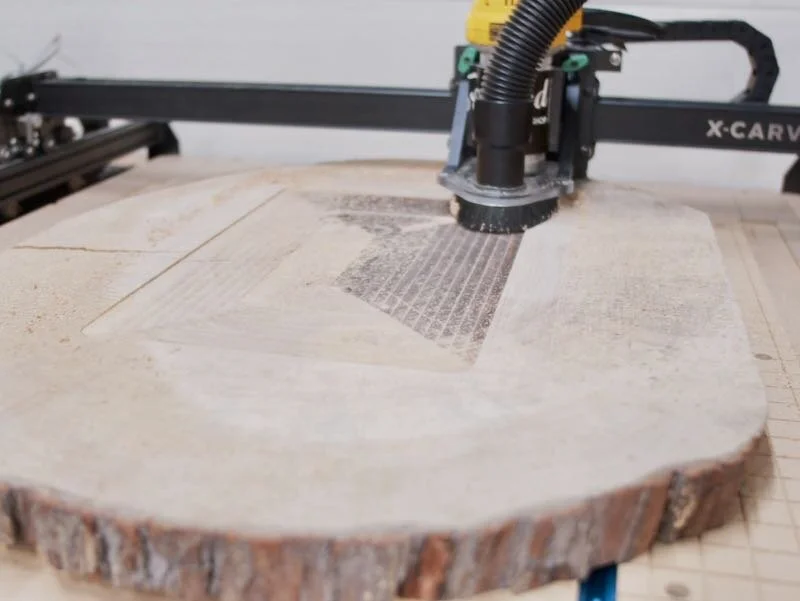
The next step in the project was to flatten the slab, and there are a ton of ways to do this. I’ve used a router sled in the past, but I decided to make life simple and put my robot, aka my Inventables X-Carve CNC, to work on this project. A CNC is basically an automated router sled with much better dust collection, and this slab happened to fit perfectly on the bed of the X-Carve.
I used this 1” diameter Whiteside spoilboard flattening bit to do the work and it did a great job considering it was cutting into Maple end grain.
I flattened one side, flipped the slab, then flattened the other side. I also sealed both faces of the slab with dewaxed shellac while I worked on the other parts of the project, to try and help keep the slab from warping again. Cookie slabs are notoriously for shifting around extremely quickly due to all of the exposed end grain, and the shellac really seemed to help.
Step 3: Rings of Target

Next, I needed to work on making the piece that would make up the target’s rings. I decided to use some old Redwood fencing that my dad gave me for this, plus a piece of Cedar to fill out the blank.
I skip planed the boards at the planer, cut them to length at the miter saw, and then ripped them into strips at the table saw. I was essentially making an end grain cutting board here, so this process might look familiar to you.
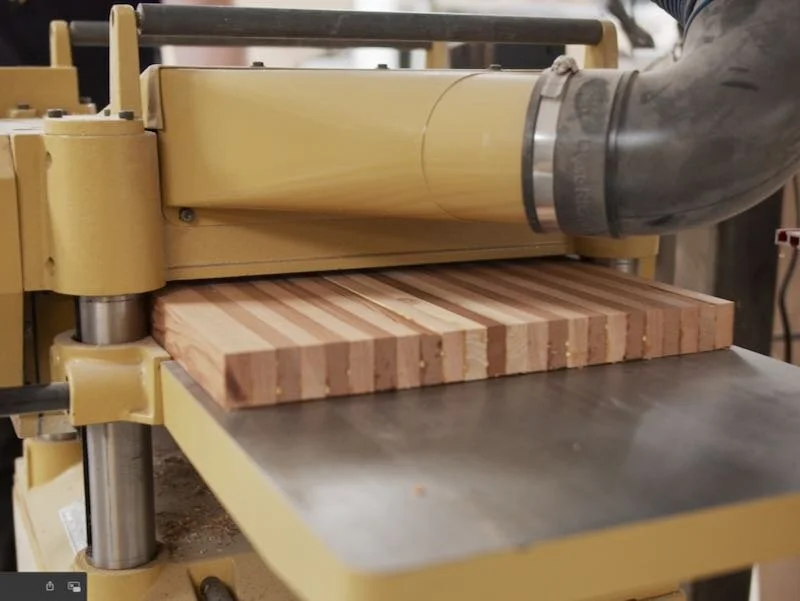
After ripping the strips, I arranged the strips into a nice pattern and glued up the first blank, actually two blanks, one for the rings and one for a bowtie.
After about an hour, I scrapped off the glue and then passed the blanks through the planer again to flatten them, then cut the blanks into more strips at the table saw. I needed to square up one end with my crosscut sled, and then I could use the fence to rip all of the strips.
For the target rings, I needed to rip the blank into ½” strips to get an end grain board that was big enough, so I started by making the first pass and then moving the fence over ⅝ of an inch between passes. The extra ⅛” is to account for the kerf of the blade.
I could have just set the fence to ½” and ripped the strips that way, but I much prefer to have more stock to hold onto, rather than ripping thin strips.

After ripping the strips, I flipped every other strip to get a cool offset pattern and then glued up the blank. The strips were pretty fragile at this point, since they were so thin, so I had to be extra careful when tapping them into place with my mallet.
I also repeated the same process for the smaller blank, but I cut those strips much thicker, about 1 ⅛”, since this blank would become the bowtie I inlayed to stabilize the crack in the slab.
Step 4: Modeling the Target Rings for the CNC
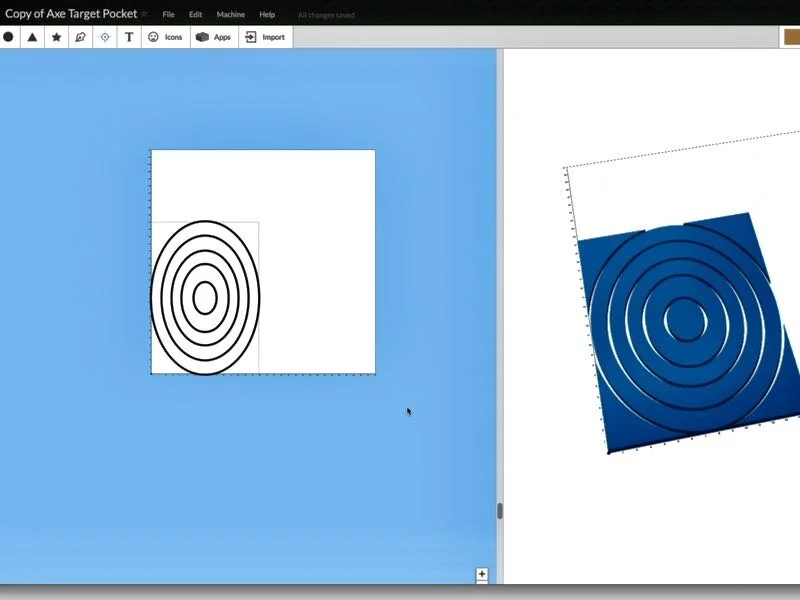
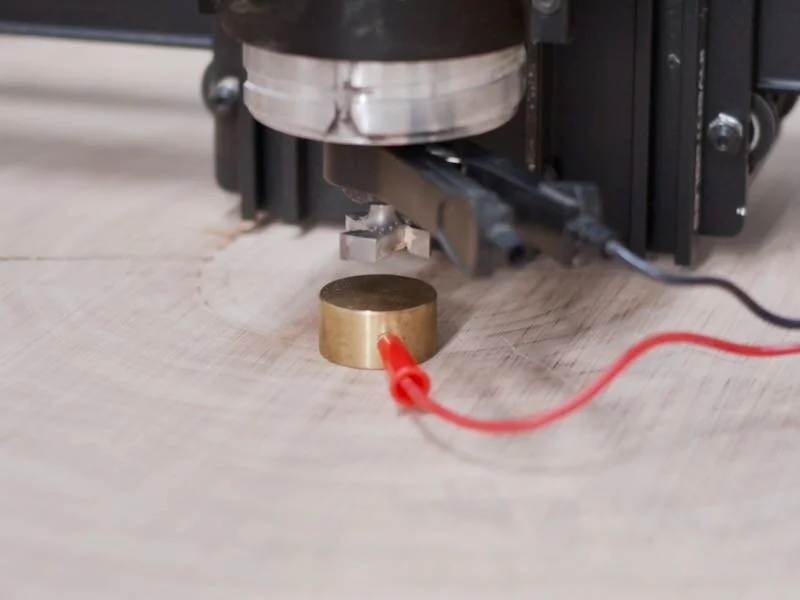
Next, I hopped into Easel, Inventables free design software, and got the target modeled up. I found a vector of a bullseye and imported that into Easel. I stretched the target into more of an oval shape, so it would match the oval shaped slab a little better, and then used Easel’s inlay generator to create the two tool paths, one to cut the pocket in the slab and the other to cut the rings out of the Redwood blank.
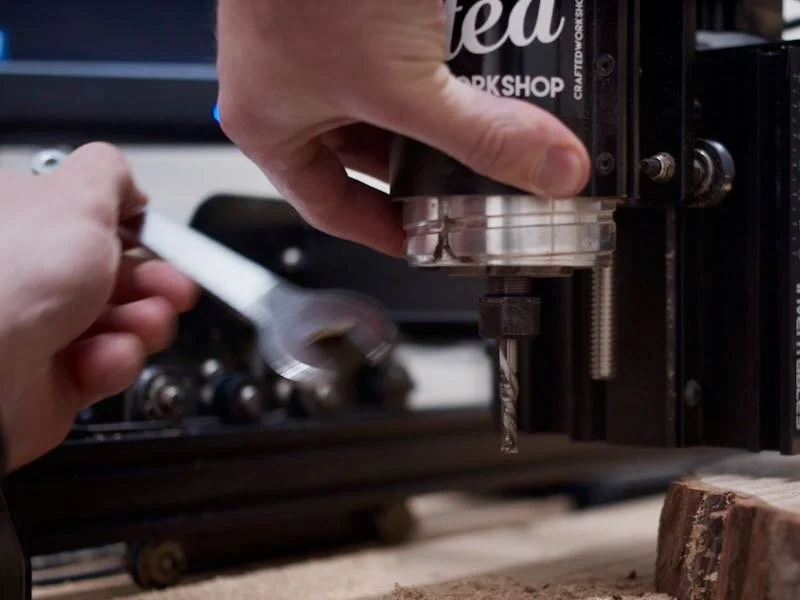
Back at the X-Carve, I installed a ¼” compression bit and then got to cutting the pockets into the slab. This went really smoothly, and it is always incredibly satisfying to watch your digital design come to life on the actual workpiece.
After the ring pockets were cut, I could cut the pocket for the bowtie using the same ¼” bit. I also cut a test bowtie out of plywood to make sure the fit was good, and it was just about perfect.

Speaking of the bowtie, next I cut the bowtie inlay out of the smaller Redwood blank. Also, in case you’re wondering, I’m just using double sided tape to hold down the pieces here and it worked like a charm. I’m halfway through adding t-track to my CNC, so I didn’t have another great clamping option. I’ll link to my absolute favorite double sided tape in the video description below in case you’re interested.
Step 5: Prepping for Assembly

Before installing the bowtie, I needed to remove the tabs that helped keep the piece in place on the CNC, and I like to use a chamfer bit to do this. The added benefit of chamfering the bottom edges of an inlay is that it gives you a little more glue area and helps to guide the inlay into the pocket easily.
Step 6: Assembly

Next, I could glue in the bowtie, making sure to use plenty of glue, especially on the sides of the bowtie since that’s the long grain to long grain connection. I used Titebond III for the inlays, since it is waterproof and should hold up well to the elements.
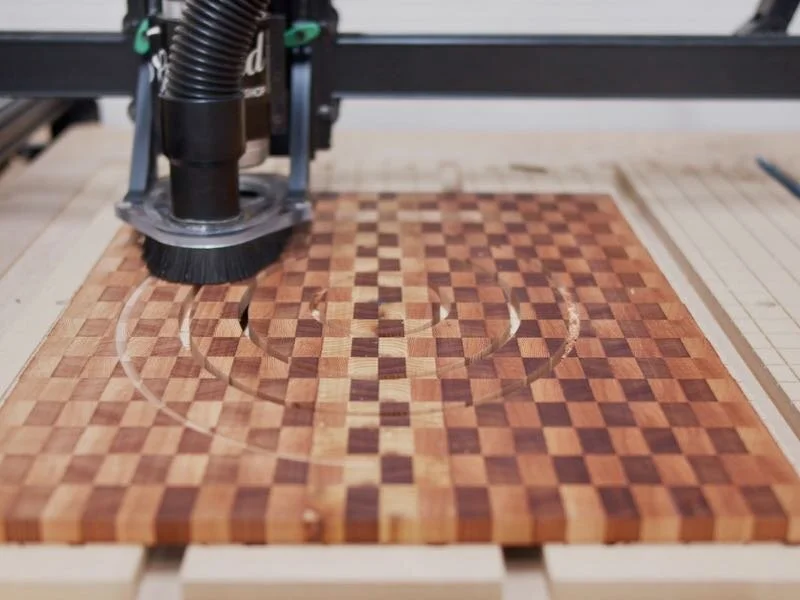
Once that was done, I could repeat the same process for the target rings, first cutting the rings on the X-Carve, chamfering the bottom edge to remove the tabs, then gluing them into place. I had to get a little creative to apply clamping pressure to the center of the slab, but I used some strips of plywood and it worked out well.
After the glue dried, I decided I wanted to further stabilize that big crack with some epoxy. I used Tyvek tape to seal the bottom of the crack, which has an incredibly strong seal, and made sure to use a pressure roller to get an even better seal.

I poured epoxy into the crack slowly, in a thin stream, to allow as much air to escape as possible, and had to do two pours to fully fill the crack.
Step 7: Finish Prep
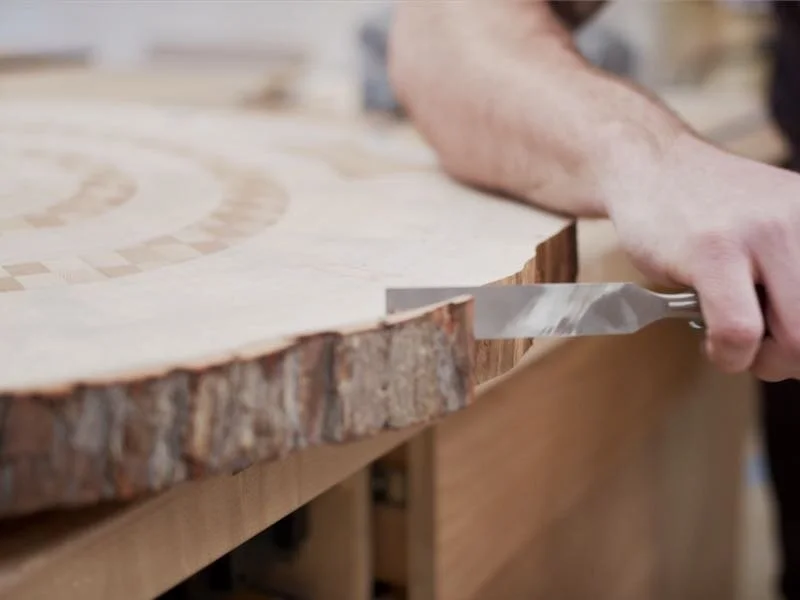
After letting the epoxy cure, I removed some of the excess with my trusty block plane, which makes quick work of removing epoxy. I also planed off some of the protruding inlay, to make sanding a little quicker. Speaking of sanding, there was a ton of it on this project.
This entire surface is end grain, so it took forever. I got the surface of the slab cleaned up with my belt sander off camera, and then I removed the bark with a chisel and mallet. Most of the bark had already fallen off, so this was really just to remove the remaining pieces. This is an oddly satisfying process, especially when you hit the bark just right and it pops right off.
After removing the bark, I cleaned up the edges with a random orbit sander and then continued to smooth out the surface of the slab. I sanded it up to 180 grit, which left a super nice, smooth surface.
Step 8: Finish

For the finish, I went with teak oil. I didn’t want a film finish, as the axe throwing would cut right through it and cause it to end up flaking off over time. Teak oil is nice as it just soaks into the wood and protects it without forming a film, but it will need to be reapplied every year or so.
Also, my freaking battery died right before applying the first coat of finish to the face of the target, which is a major bummer as that looked awesome, but here’s a shot of the second coat being applied.

Step 9: Mounting
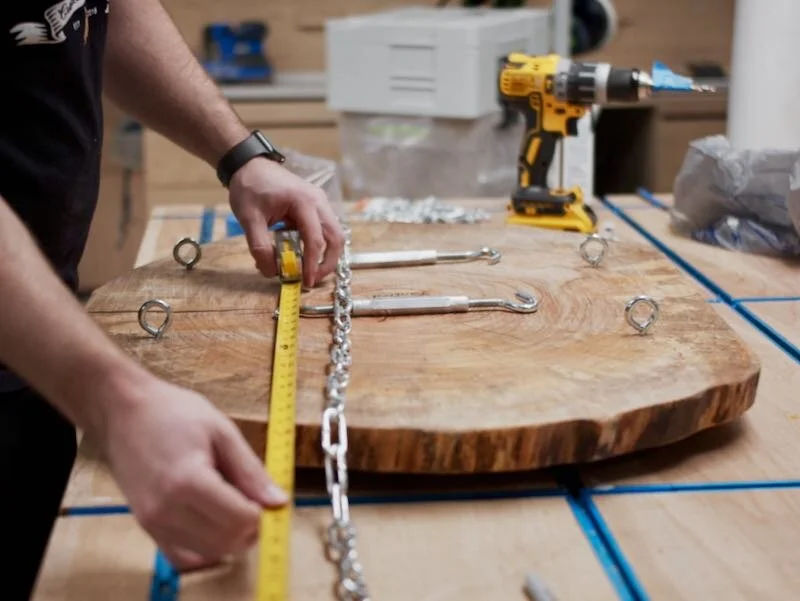
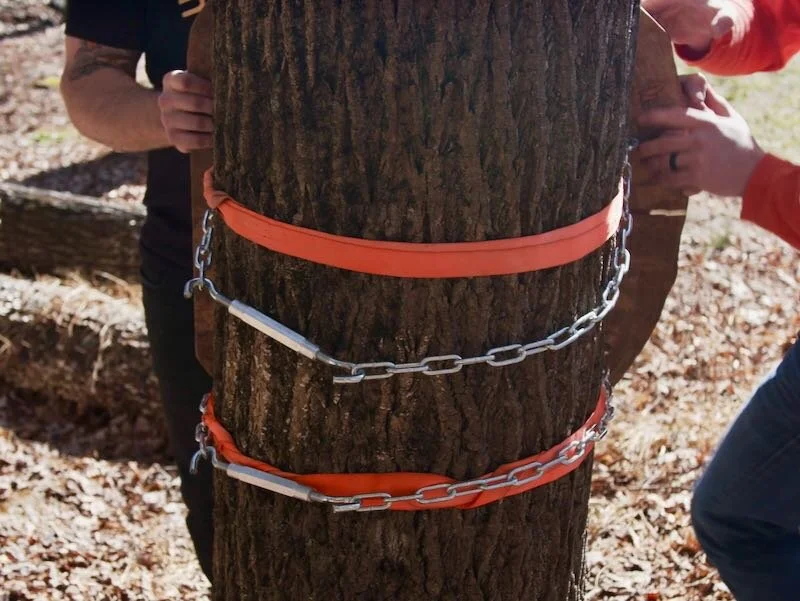
After finishing, all that was left to do was to mount the target to the tree. I decided to use some chain to do this, so first I installed some eye bolts on the back face of the slab, where I could attach the chain.
I cut the chain to length with my portaband, although a hacksaw would also work great here.
To connect the two pieces of chain around the tree, I used a turnbuckle, which allowed me to tighten the chain and keep the target from moving around. I also added some nylon webbing to protect the tree.
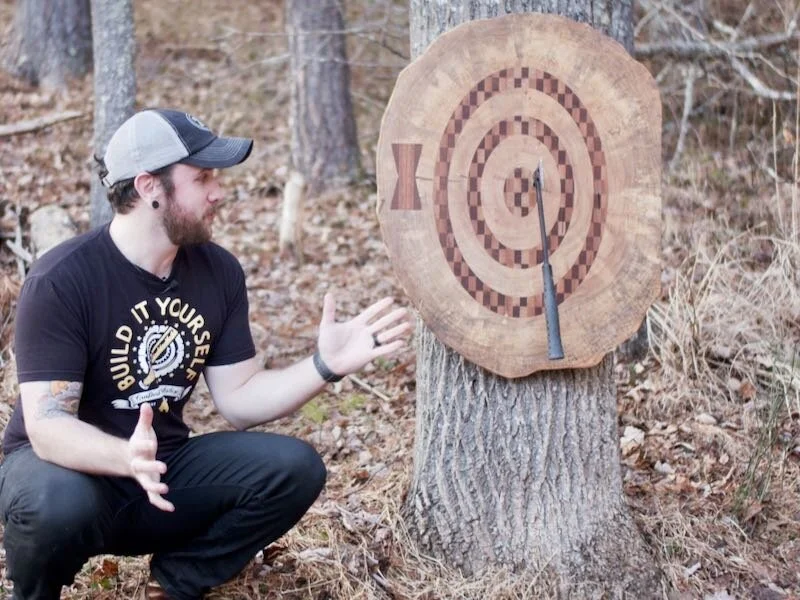
Step 10: Throw
With that, all that was left to do was throw some axes at this gorgeous target, which I was honestly a little hesitant to do at this point. But, it had to be done.