
Turning A Bowl From Recycled Skateboards
I turned a bowl made from old recycled skateboards! I'm really wanting to get better at woodturning this year, and this skateboard bowl project was a great learning experience.
Support My Sponsors
Check out the TotalBoat High Performance Epoxy and Table Top Epoxy I used!
🛠 Tools Used On The Skateboard Bowl (affiliate):
📦 Materials Used On The Skateboard Bowl (affiliate):
Broken Skateboards (duh!)

Pin it!
Build Process:

This project started when I asked my buddy Ben from Woby Design to send me a blank that I could turn. I had seen some bowls turned from skateboard pieces and I really wanted to give it a shot. Ben specializes in making things out of old broken skateboards and has a great setup for gluing up these blanks with a bottle jack.
Little did I know he was going to send me a package full of blanks, so I’ll definitely be making some more things in the future out of these old skateboard pieces.
Step 1 : Mounting The Blank On The Lathe & Roughing Out

To get the blank mounted on the lathe, I decided to use a face plate, so I first needed to get one face of the blank flat. I used my jointer for this, but a hand plane would definitely get you close enough.
After flattening that face, I marked the center and then screwed on the faceplate, making sure to pre-drill since this is basically a big chunk of plywood edge grain.
Next, I got the piece mounted on the lathe, set my speed to about 700 RPM, got my tool rest in place, and got to roughing out the shape. This was a little rough, since this blank was so out of round and chunks of the blank wanted to pop off as I went. I was also turning mostly air when I started roughing, but eventually got the piece mostly round.
Step 2 : Cutting A Recess Into The Bottom & Sanding The Outside

Next, I started cleaning up the bottom, first facing it off and then cutting a recess for my chuck jaws. I made sure to take my time and sneak up on the fit here, as I really didn’t have a lot of wiggle room before making the walls of the recess too thin.
With the mortise cut, I continued shaping the outside of the bowl until I got really close to the final shape. I used my Woodpeckers carbide tools on this project, and they have a great feature of being able to turn the tool 45 degrees and make a shearing cut. This really smooths out the surface and helped remove any tearout on the surface of the bowl.
Next, using this drill mounted sanding pad, I sanded the outside of the bowl up to 220. I definitely made sure to wear my respirator here, as this creates an insane amount of dust.
Step 3 : Turning The Inside Of The Bowl

With the outside of the bowl sanded, I installed my chuck in the recess on the bottom of the bowl and then flipped the whole thing around, installing the chuck on the headstock and then removing the faceplate.
Next came the process of hollowing out the bowl. Again, since this whole piece was basically plywood edge grain, this was a little rough, so I decided to instead drill a hole to depth using a 2” Forstner bit, to help both remove a good portion of the waste and also help set my depth.

This was a super slow process and I had to run the lathe at about 250 RPM to keep the bit from getting to hot, but I eventually got the hole drilled and could continue hollowing out the bowl, which went really quickly now that the center of the bowl was gone.
I switched over to my round carbide tool at this point and just continued removing material until I got an even wall thickness all the way down. I recently picked up one of these calipers and they were really helpful in telling me where more material needed to be removed.
I also picked up a curved tool rest recently and it made getting the very bottom of the bowl much easier, although the camera wasn’t in the best spot here and I’m basically blocking the entire view.

I was actually really happy with the surface finish I ended up with and really feel like I’m getting more comfortable with my turning. It’s something I definitely want to do more of in 2019, and I especially want to try my hand at using traditional tools this year, just to see what they’re like.
Next, I sanded the inside of the bowl up to 220 grit, again with the foam sanding pad.
Step 4 : Applying The Table Top Epoxy Finish

For the finish on this bowl, I wanted to experiment with using some TotalBoat Table Top Epoxy. Even after sanding, the surface of the bowl had some voids and other imperfections due to the fact that this was made from old skateboards, and I figured a few coats of epoxy would fill any voids and give the surface a nice, even feel.
On this first coat, I applied way too much epoxy, and it was also too cold in my shop. This meant that I had a good number of drips and sags, and the epoxy didn’t self level as well. I basically had to remove all of this epoxy and try again, this time using a much thinner coat and warming the epoxy in some warm water before applying.
After applying two thin coats, I was left with a close to perfect surface. I actually considered just leaving it exactly how it was at this point, but I wanted to really level the surface and then buff it out to a more even gloss.
Step 5 : Leveling The Epoxy & Applying Yorkshire Grit
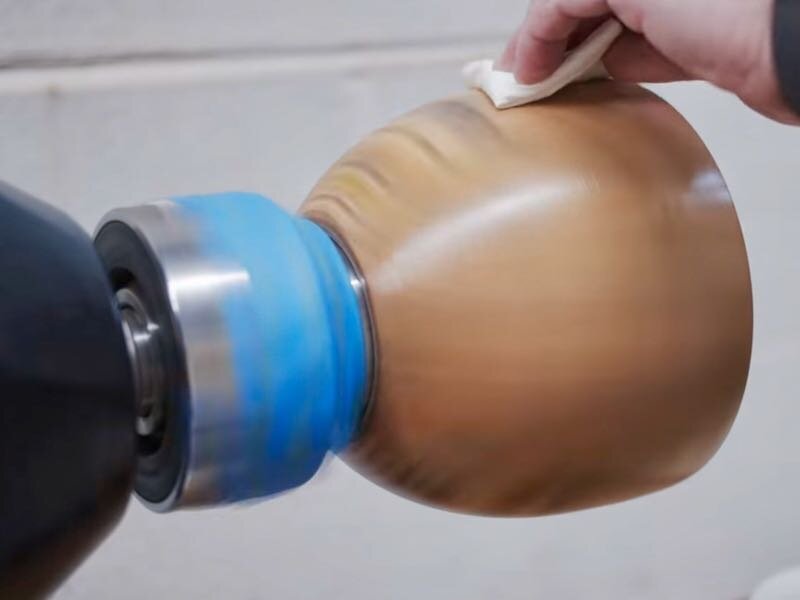
I started with 220 grit sandpaper on the foam pad, just to level things out, and then worked my way up to 500 grit with hand sanding.

Next, I used Yorkshire Grit, which I’ve seen some other epoxy turners use with a lot of success. I first applied the regular Yorkshire Grit, following the directions on the can. After getting an even surface with that, I moved up to the Microfine version, which further refined the surface and left me with a beautiful, even sheen.
Step 6 : Finishing The Bottom Of The Bowl

The last thing to deal with was the bottom of the bowl, and I got an idea from watching David Picciuto’s recent bowl turning video. I laser cut a piece to cover up the inside of the recess and added my maker’s mark, and Ben had included some thinner pieces that were perfect for this. I just glued the piece in with CA glue and then poured on a thin layer of TotalBoat High Performance Epoxy to finish it.
With that, the bowl was done!