
How To Build A Walnut Jewelry Box with Hand Cut Dovetails
This Walnut Jewelry Box features hand cut dovetails, stopped dados, hardwood drawer runners, and precise hardware, definitely a skill builder!
Note: Links below are Amazon affiliate links
🛠 Tools Used On The Jewelry Box:
📦 Materials Used On The Jewelry Box:

Pin it!
Step 1: Choose Material To Build Your Jewelry Box From

I built this project out of some gorgeous Walnut I had on hand, and the first step in the process was laying out all of my parts and pieces onto the boards I had. I wanted to have a continuous grain pattern wherever possible, so I tried to get the drawer fronts and sides from the same areas and made sure to label the pieces so I could keep track of them.
Step 2: Mill The Lumber Down To Rough Sizes For Parts

Next, I started breaking down the boards using my crosscut sled. As you can see, these boards cupped terribly when I resawed them for a past project, and that’s why the boards have been sitting on my lumber rack ever since. The cupping wasn’t an issue for this project though, since I would be ripping the boards into much smaller pieces before flattening.
I did the ripping over at the bandsaw, since ripping these pieces at the table saw would have been pretty risky with that extreme cupping. This also helped me conserve more material since the bandsaw’s blade has a smaller kerf.
With the pieces cut to rough size, I could start getting one face and one edge on each piece squared up at the jointer. Some of these pieces were really tiny, so it was super important to use a push block. I recently picked up a rubber grout float and it makes for the perfect push block, since it’s super grippy with a nice, comfy handle.
Before planing off the faces with my labels on them, I transferred the labels to the freshly jointed faces of the pieces, so that I could still keep track of which piece was which. Unfortunately, I tried using painter’s tape here and it made a huge mess on my planer bed when it got scrapped off. Don’t do this.
I planed the boards to rough thickness and then brought them down to final thickness at the drum sander. While a drum sander isn’t a requirement for this project, it is incredibly helpful since a lot of the tolerances on these pieces are much tighter than your typical furniture project.
Step 3: Review Pieces Of Jewelry Box

At this point, I was only working on the pieces that made up the carcass of the jewelry box, and let’s actually take a second to take a look at the model to see how these pieces come together.
The top, bottom, and sides are all connected with dovetails, and then the horizontal and vertical dividers are connected to the frame with stopped dados. I thought about using sliding dovetails here, which would have also worked great.
Back to the project, with the boards at their final thickness of ½”, I could trim the outside pieces to their final size at the table saw and miter saw. When cutting dovetails, it’s extremely important everything is super square, so I really took my time here.
Step 4: Hand Cutting Dovetails
Next, I could start laying out my dovetails. First, I set my marking gauge, using one of the boards as reference, and then transferred a line to all four edges of my tail boards, which were the top and bottom boards in my case.
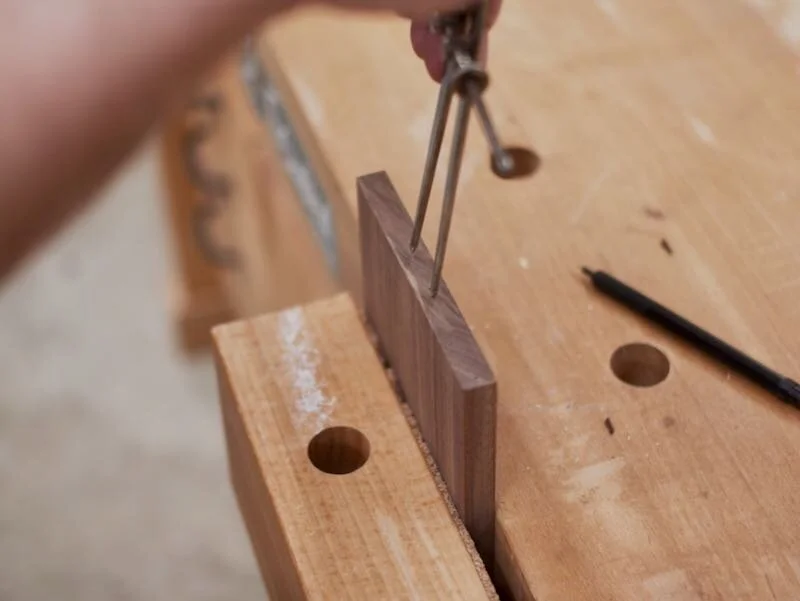
Next, using a set of dividers, I could walk off my dovetail spacing, which is really up to you and is largely aesthetic, but I ended up with five tails per corner.
After marking the locations, I marked lines across the end of the board using a marking knife and small square.

To help me cut the dovetails accurately, I used a dovetail jig from my buddy Jonathan Katz-Moses. This was my first time using his dovetail jig, but I found it extremely intuitive and easy to understand. It’s really nice that the different faces are marked with their different functions, and the fact that the jig is clear makes it easy to see your layout lines.

To cut my tails, I started with the tails side of the jig, set it in place so the outside edge of my saw lined up with the waste side of my line, and then cut to my baseline. I just repeated this process across the board, cutting one side of the tails, then flipped the board around and repeated the process.
It’s really important to stay clear of your baseline here, otherwise you will have saw kerf marks on your final piece. I also went ahead and marked the waste areas, which I should have done prior to cutting the tails just for a visual reference.


To cut away the area for the half pin, I turned the board 90 degrees and used a chisel to create a little valley for my saw to ride in. This is a trick I picked up from Paul Sellers and it works incredibly well.

With that little valley established, I could rest my saw there, then move the jig into place, this time using the 90 degree face, and cut away the waste. All that was left was a little sliver in the inside corner, which I cleaned up with a chisel.
Next, it was time for lots of chopping. When cleaning up the bottom of dovetails, it’s best to only cut about halfway through, to avoid blowing out the other face of your board. You also generally want to take multiple passes, cutting away about 1/16” of material at a time. If you try to chop away too much material, the bevel of the chisel will be pushed back, which will result in the cut going below your baseline, leaving a gap in your final piece.

It’s best to really take it slow here, and it is also important to have super sharp chisels. I really should have sharpened my chisels before this project, but I relied on my strop to get me through. You can see the crushed fibers in the middle of the board, due to my chisels not being sharp enough.
With the tails cut, I could move on to cutting the pins. First, I clamped my pin board into my vise, with the end of the board even with the side of my low angle jack plane. Next, I lined up the edge of the tail board with the edge of the pin board, resting the other end of the tail board on the plane, and, after making sure everything was lined up properly, I transferred the location of the tails using a marking knife.
After transferring the tails, I marked the waste areas and then marked my baseline on the two faces of the board, but not the edges, since this was the pin board.
With everything marked out, I could start cutting my pins. I oriented the jig so the pins face was facing my saw and, again lining up the outside of my saw with the inside of the waste area, I started cutting the pins. One thing I think I’ll add to this jig in the future is some peel and stick sandpaper, to help keep it firmly in place when sawing. The acrylic is a little slick as is.
After cutting the pins, I again cut away the majority of the waste with a fret saw and then collected some saw dust, which I used to fill some gaps in my dovetails later on.
Next, I cleaned up the bottom of the pins and, again, cut away this material in multiple passes. When I got to my final pass, cutting to my baseline, you can actually hear how the chisel drops into the line cut by the marking gauge.
That’s one big advantage of using marking tools with blades, you have a positive engagement with whatever tool you’re using.

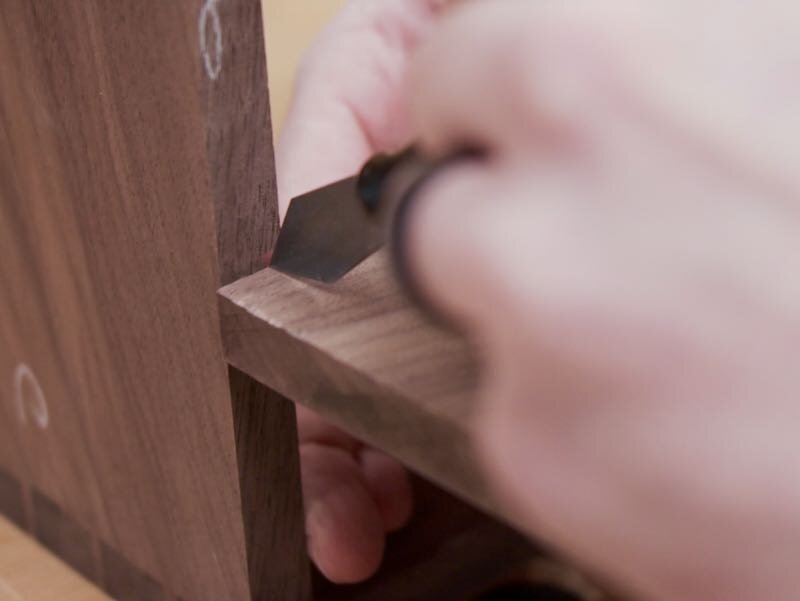
After cleaning up the pins, I could test fit the board and they were almost there, but just needed a little refinement. I didn’t want to use a chisel here, as I really didn’t need to remove much material, so I used a fine file to dial in the fit. I need to pick up a file with one flat edge, with no teeth, so I can rest the file on the bottom of the pins.

After a little filing, I dry fit the joint and was really happy with how tight all of the edges were. This was only my second time using dovetails on a project, so I’m still extremely new to them.
Next, I needed to repeat that process three more times, which actually went pretty smoothly.
After dry fitting the carcass, I used a card scraper to remove most of my layout marks and flush the edges up, and also remove some of the scratches left by the drum sander.
Step 5: Layout All Box Parts For Dados

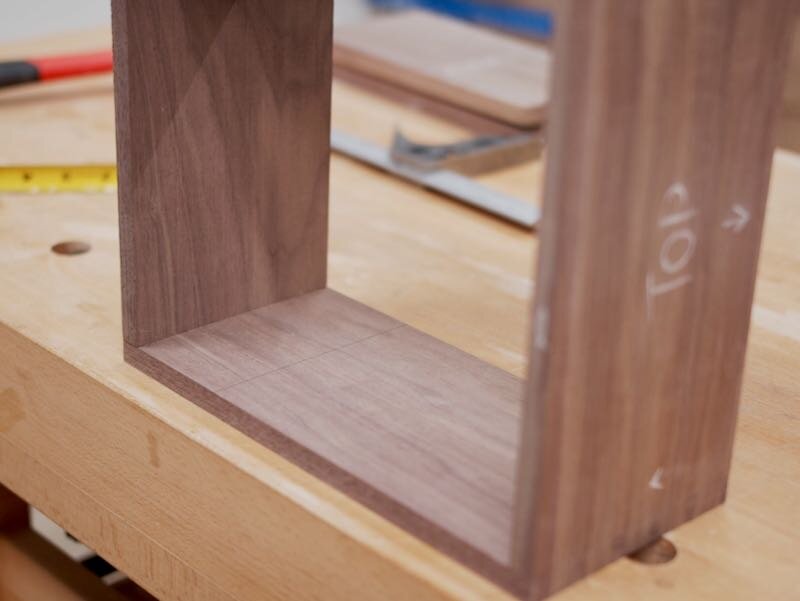
With the carcass dry assembled, I could start laying out the locations for the stopped dados. The first dados were to house the horizontal divider, and I marked these out with a tape measure and square.
Next, at the router table, I installed a ½” straight bit and marked the location of the bit on the fence. I then marked ¼” from each side of the bit, which is where I stopped the dados.

On the first dado, I needed to lower the piece onto the router bit, which is a completely safe operation as long as the piece is firmly positioned against the fence and table. After lowering the piece onto the bit at my ¼” mark, I pushed the board through, making sure to use a backer board to avoid blowout.
The other side was a little simpler, as I could just run the board through until the edge got to my ¼” mark, and then I could turn the router off.
This resulted in two mirrored stopped dados.
Step 6: Installing Dividers In Your Jewelry Box
I re-assembled the carcass, marked the length of the horizontal divider, and then cut it to length at the miter saw, sneaking up on the fit. I also went ahead and ripped both dividers to final width, which was ¼” narrower than the outside carcass pieces since there is a ¼” back panel on this box.
Next, I repeated the same process to cut the dados for the vertical divider.
Once I had both dividers dry fit, I marked where the pieces intersected the other boards, so I could cut a notch to allow the boards to be flush with each other.

To cut this notch, I again used the dovetail jig, using the 90 degree face, and cut the notch the same way as the half pin waste on the tail boards. It’s better to cut this notch slightly wider than you need, so it has plenty of clearance at the end of the dado.
After notching the dividers, I could dry fit the carcass and it was looking great.
Step 7: Rabbeting The Back Edges Of The Jewelry Box

Next, I went ahead and cut the rabbet onto the back edges of the outer carcass boards. The top and bottom boards had a stopped rabbet, to avoid having a hole on the sides of the box. I made this rabbet ¼” wide by ¼” deep, and I squared up the corners after the carcass was assembled later.
Step 8: Building The Drawers For The Jewelry Box

With the carcass dry fit, I could get to work on making the drawers, since I now knew the final size of the openings. I started by getting all of the pieces to their final thickness, and I used my drum sander for this since the pieces were really too small for my planer at this point.
When cutting the pieces to their final width, I made sure to cut all of the pieces of one type of drawer while I had the fence set for that size. For example, the larger bottom drawer is a little taller, so I cut all four sides of that drawer at once, then moved the fence and cut all of the pieces for the three smaller drawers.
I then cut the fronts and backs to final length at the miter saw.
For the joinery on the drawers, I decided to go with rabbets on the fronts and backs of the drawers. Rabbets are plenty strong for this application, and they allowed me to have inset drawers and still have the hardwood drawer runners be hidden.
I set up a dado stack on my table saw, with the width of the stack matching the thickness of the boards and the depth at ½ of the board thickness, set up a stop block on my miter gauge, and got to cutting the rabbets. There was a small sliver left after each pass, and I just cleaned up it by sliding the board over and making another pass.

With the rabbets cut, I could cut the sides of the drawer to final length at the miter saw.
Next, I needed to route the grooves for the drawer runners into the sides of the drawers, which I did at the router table. I made a pass and then flipped the board around, to make sure the groove was perfectly centered on the sides of the drawers. This also added a little clearance, so that the drawers didn’t bind on the runners.
The last piece of joinery to cut on the drawers was the rabbets to house the drawer bottoms. I decided to challenge myself and use all solid wood on this project, and a rabbet is a really great option for a solid wood drawer bottom, as it allows for seasonal expansion and contraction. The rabbet was ¼” wide by ¼” deep, and I cut it on the inside of all four drawer sides.
Next, I milled some pieces to slightly thinner than ¼” for the drawer bottoms and cut them to size at the table saw and miter saw.
Before assembling the drawers, I sanded all of the inside faces up to 120 grit, mainly focusing on removing the scratches left by the drum sander. I always forget to do this prior to cutting joinery, and this resulted in some overhanging areas after assembly. Make sure to do your major sanding prior to cutting things like rabbets or dados, as you’ll end up with loose joints otherwise.

Gluing up the drawers went fairly uneventfully, although keeping the drawers square now that I had done all that sanding was a little trickier than it needed to be. I also only added glue to the center of the drawer bottoms, again to allow for expansion and contraction.

The next piece of joinery on the list was the dados for the hardwood drawer runners, which I ended up cutting in the wrong location. For some reason, I decided to try to work out the math in my head on the fly, rather than referencing the actual drawers, and I got it completely wrong. While the locations were wrong, the process was right, so let’s just focus on that.
The process was the same as when cutting the dados for the dividers, as I was cutting stopped dados again. This time, when marking the lines on my fence, I decided to use painter’s tape to keep the lines from wiping off, but the tape just ended up tearing.
After cutting the dados, I cut some strips for the drawer runners. I cut them slightly oversized and then used the drum sander to bring them down to the final size, checking the fit along the way.

Next, I squared up the ends of the stopped dados, making sure they ended ¼” from the front edge of the cabinet. These runners would also act as stops for the drawers if they were too close to the front edge, so I needed to make sure they wouldn’t interfere.
Before trying out the drawers, I needed to route the rest of the groove through the back panel of the drawer. I could have routed these grooves all at once after assembling the drawers, but I would have had to square up the front of the grooves with a chisel, so I’m not sure which way would have been faster.

With the grooves extended, I could test fit the drawers and they were fitting really nicely. The bottom drawer was a little snug, but that’s what I wanted considering I still had sanding to do on the outside of the drawers.
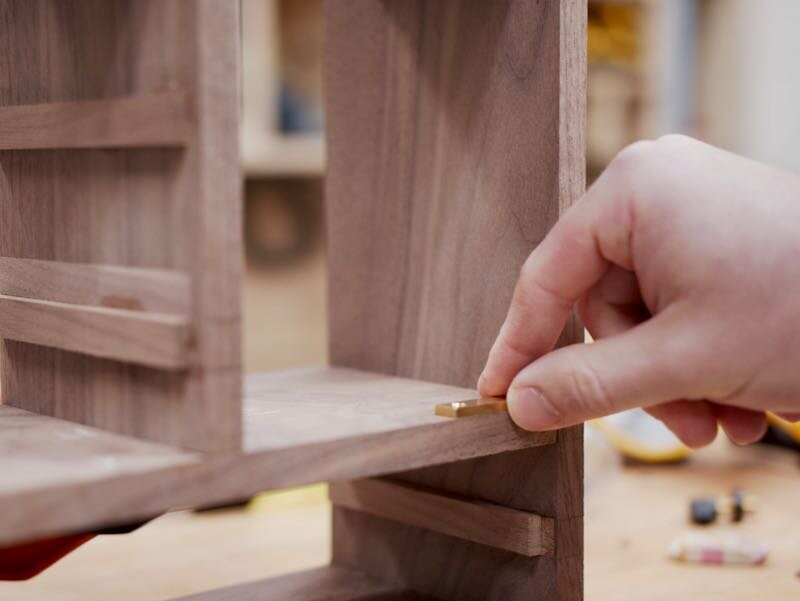
With the drawers working well, I could go ahead and glue in the drawer runners. I first sanded the inside faces of the cabinet up to 120 grit since it would have been extremely tough to sand around the runners, and you can see where I had to patch my failed drawer runner dados as well. Luckily, none of these will be visible in the final piece.

I only glued in the front half of the drawer runners, to allow for expansion and contraction, although I’m not sure it really matters with this small of a piece.

Step 9: Construct The Door And Add Brass Hardware

The next piece on the list was the door, which I flattened on the jointer and drum sander, and then cut to width at the table saw. Or, I should say, basically cut in half since I was rushing and forgot to adjust the table saw fence, so I had to mill another door piece, and then cut that to width and length, still leaving it slightly oversized.
Since this door was one solid piece, I needed something to help keep the door flat, and I decided to add some strips to the back of the door with sliding dovetails. I cut most of the bulk with the same ½” straight bit, spacing the dados evenly from both ends of the door.

Next, I swapped over to a dovetail bit, setting the depth slightly higher than the straight bit, and then routed in the dovetail profile on both sides of the dados. I made sure to use a backer piece to avoid blowout, but still got some on the front edge due to the crazy grain on this piece.
I could then cut the strip to go in the dovetail slot, which I made out of some more Walnut. I snuck up on the fit here, moving the fence in tiny increments until it fit snugly.

I then cut off the strip at the table saw and repeated the process again, to give myself two strips.
I cut the strips to length at the miter saw, making sure to leave them about ½” longer than they needed to be, and then I glued the strips into the slots, again making sure to only add glue to one half of the strips to allow for wood movement.
After the glue dried, I could get the strips mostly flush with my low angle jack plane, which made really quick work of this.

To get it to final thickness, I once again used my drum sander, and then could clean up the edges with the jointer and table saw.
Step 10: Finalize Brass Hardware In Jewelry Box
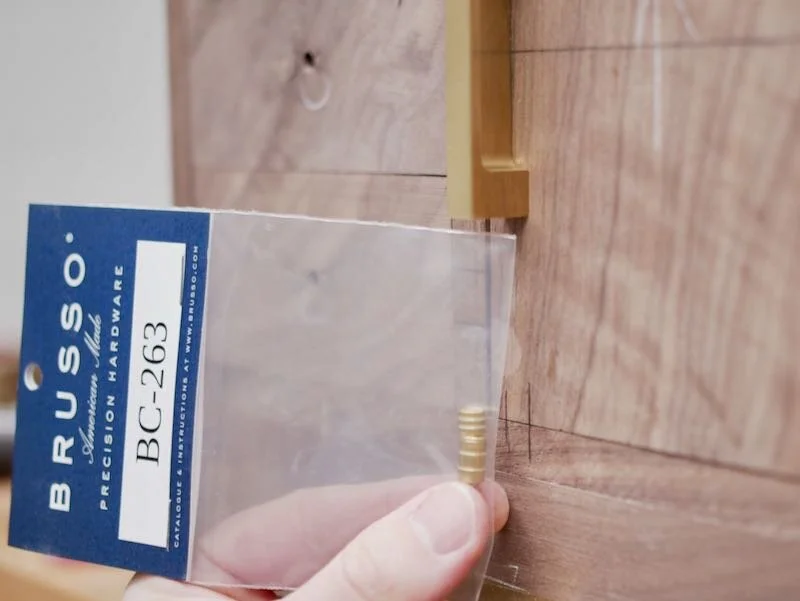
For the hinges on the door, I went with offset knife hinges from Brusso, and this was my first time working with these types of hinges. Frankly, I was extremely nervous due to the precision you need when installing the hinges but the process went really smoothly.
First, I set up a ⅜” guide bushing on my trim router, using a centering pin to make sure the bushing was centered with the bit.

Next, I installed a ¼” spiral bit and set the depth stop, using the Brusso template and hinge for reference.
This template really made this process easy, as it references off of the edges of your workpiece. Brusso also has really great instructions, including an instructional video, showing how to use this jig.
After making a test cut on a scrap piece, I could move on to routing the actual workpiece.
After routing the recess, I needed to square up the corners with a chisel, and then I pre-drilled holes using a self-centering bit and then added screws. Brusso includes a steel screw, which you can use to pre-cut the threads into the wood, which makes driving the brass screws much easier. I needed to cut down the screws for the hinges which installed on the carcass, and the brass was soft enough to cut with pliers.

Also, you might be cringing at me installing these screws with an impact driver, but this particular impact driver has a fragile screw setting that worked perfectly without stripping any of the screws.
Brusso also includes this little brass spacer for routing the recesses on the ends of the door, which provides the 1/32” spacing required.

Other than using the spacer, the process was the same when cutting the recesses on the door. Also, I of course didn’t need to shorten the screws here.

Next, I could install the rest of the hardware, which there was quite a bit of, all from Brusso.
First was the pulls on the larger drawer and door. I used this Rockler template to mark out the hole spacing and then drilled the holes. I also needed to shorten these screws, which I did using my belt grinder.

Next was these tiny pulls for the small drawers, which just friction fit into a drilled hole. I marked the center by finding the diagonals of the drawer faces, used a center punch, and then drilled the holes at the drill press.


The next piece of hardware was this spinning hook, which will be used for necklaces and bracelets. Again, this is just friction fit in a drilled hole, so I marked the center in the area where the hook will be placed and then drilled the hole at the drill press.


The last bits of hardware, for now at least, were these brass feet. Again, these just need a hole drilled, and I used a Forstner bit for this.
Back to the door, I could test fit it on the hinges and the height of the door was perfect, which was a big relief. I knew I’d probably need to trim the width of the door a bit, which I did at the table saw, but I also added a bevel to the back edge of the door to give it a little more clearance.
Once it was trimmed the width, the door looked great, with a nice even reveal.
Before disassembling the cabinet for the final glue up, I marked the location for the ball catch, which you can see here, and this will keep the door in place when shut.
Step 11: Glue Up The Carcass Of The Jewelry Box

Finally, I could get the carcass glued up, which went fairly smoothly, although I realized that just clamping on the inside of the dovetails was creating too much of a bow, so I added some spacer blocks so that I could clamp right in line with the corners.
After the glue setup, I removed the clamps, spread some glue over the dovetails, and then added some of that sawdust I had saved earlier. I worked this into the glue, and this makes the perfect gap filler, since it matches the color perfectly. Even though I ended up with some gaps in my dovetails, you’d never know if you hadn’t seen this video.

Step 12: Finalizing Each Part Before Applying Finish To The Jewelry Box

While the glue dried, I drilled the holes for the ball catch. The depth is extremely important on these holes, and it’s best to really sneak up on them. You want the outer sleeve of both pieces to be flush with the surface of the board, with the ball and grooved area protruding.

With that done, I could glue up the rest of the carcass, adding both dividers.
While that dried, I worked on the back panels. I resawed a thicker board to get both panels and brought it down to final thickness using the planer and drum sander. I cut the boards to final width at the table saw and final length at the miter saw.

Again, since I was using all solid wood on this project, I had to allow for expansion and contraction, so I decided to have the back panels connect with a shiplap joint. To cut this joint, I set up a ¼” straight bit on my router table, and set it to cut an ⅛” by ⅛” groove in the edge of the boards. I started with the bit a little low and snuck up on the fit on the second pass.
I attached the panels with one screw in the center of each end of each panel, again to allow for expansion and contraction. I used some playing cards to space the panels evenly and pre-drilled and countersunk holes for the screws.

Step 13: Finish Prep (Sanding)

Next, I could move on to sanding, lots and lots of sanding. First, I removed all of the sawdust and glue using my Rotex, which revealed some absolutely perfect looking dovetails, which I was really pleased about.
After sanding away the excess sawdust, I moved on to the finer sanding, working my way up to 180 grit on all of the parts. I didn’t want to remove too much material from any of the parts, as I didn’t want to change the fit of any of the pieces. I really just wanted to remove any tool marks and get everything nice and smooth.
I also added a very light chamfer to the edges of the carcass, as well as the drawers and door, with my block plane. I also broke the inside edges of the carcass with some hand sanding.
Step 14: Apply Finish To Jewelry Box

After getting everything sanded, I sprayed on a few coats of Shellac to finish the jewelry box. I don’t use Shellac very often, but I figured it would be perfect for this project, since it’s such a low wear piece and Shellac is so easy to repair if needed.


